How to use WordPress: Answering 12 common WordPress questions

WordPress is huge. According to the latest stats, WordPress powers almost 35% of the web — and growing quickly. With so many sites using the CMS and so many new sites bursting onto the scene, there’re a lot of new users taking their first steps in the wonderful world of WordPress. People from all walks of life and many of them are bound to ask the same questions about using WordPress. That’s one of the reasons why we launched a free WordPress for Beginners course. In addition, you can quickly get answers to common WordPress questions in this big guide.

New to WordPress? Don’t worry! Our FREE WordPress for beginners training is here to help. Find out how to set up your own site, learn the ins and outs of creating and maintaining it, and more. Soon you’ll be able to do it all by yourself!

Table of contents

1. How to start a WordPress site?

So you’ve decided to start your own blog. Hooray! Before you start blogging away, you’ll have to take some steps, like setting up your own WordPress site. But there’s more to starting your own blog! Here, we’ll give you some more pointers on how to hit the ground running.

A purpose, niche, but don’t forget to have fun!

While years ago you’d follow blogs because of the person behind them, nowadays it’s all about answering people’s questions, a purpose for your blog and link building. Or that’s what it might look like. Don’t forget that blogging should be fun, as it is fun! There’s no such thing as too many blogs, as there’s no one like you. It’s cliche, but it’s the truth. 

Before you start your blog, you need to decide whether you just want to write for fun or to help others and get high rankings. In the first case, you can start a personal lifestyle blog with everything you love. In the second case, you might need to find yourself a niche as this will increase your chance of ranking tremendously.

When you know who you’re writing for and what to write about, you can start working on your first blog posts! Want to make sure this post will be awesome? Then read this step-by-step guide on how to craft the perfect blog post.

Read more: How to start a blog »

2. How to choose a host for your WordPress site?

What to look for in a WordPress host? There are hundreds, if not thousands, of WordPress hosts. How to pick one that’s perfect for you? Check out this curated list of WordPress hosts that we’ve gathered, and consider the following aspects when making a decision.

Speed and stability

Are you going for a small travel blog? Or are you planning to cater to the clothing needs of half a country? Based on what you’re planning to do with your website, you should pick a host that has reliable uptime and keeps running during busy hours. Make sure they can provide a seamless way for you to grow. Because as you gather more daily visitors, you will need to upgrade your hosting at some point.

Accessibility and services

It is good to know if your host provides a support crew that is willing and able to help you with both your financial and technical questions. The following services might also be useful:

  • Alternative ways to access your data in case your WordPress website breaks.
  • A user‑friendly control panel that suits your needs.
  • The service to register and/or maintain domain names.

Security

Even if you don’t know much about the internet and security, you want your websites’ visitors to be safe. Go for a hosting provider that, at the very least, offers the following:

  • (Installation of) Paid or free SSL certificates.
  • Up‑to‑date server software.
  • Continuous malware/virus scans.

Optionally, check for:

  • The option for a 1-click staging environment: this makes building and maintaining a  site much easier.
  • Data retention and regulation protocols: based on your country’s laws, make sure you know where the data is stored and how it is handled.
  • Backup services: if something breaks, you will want to be able to restore it quickly.

A decent firewall (sometimes provided as an additional service, like CloudFlare).

3. How to get to the WordPress dashboard

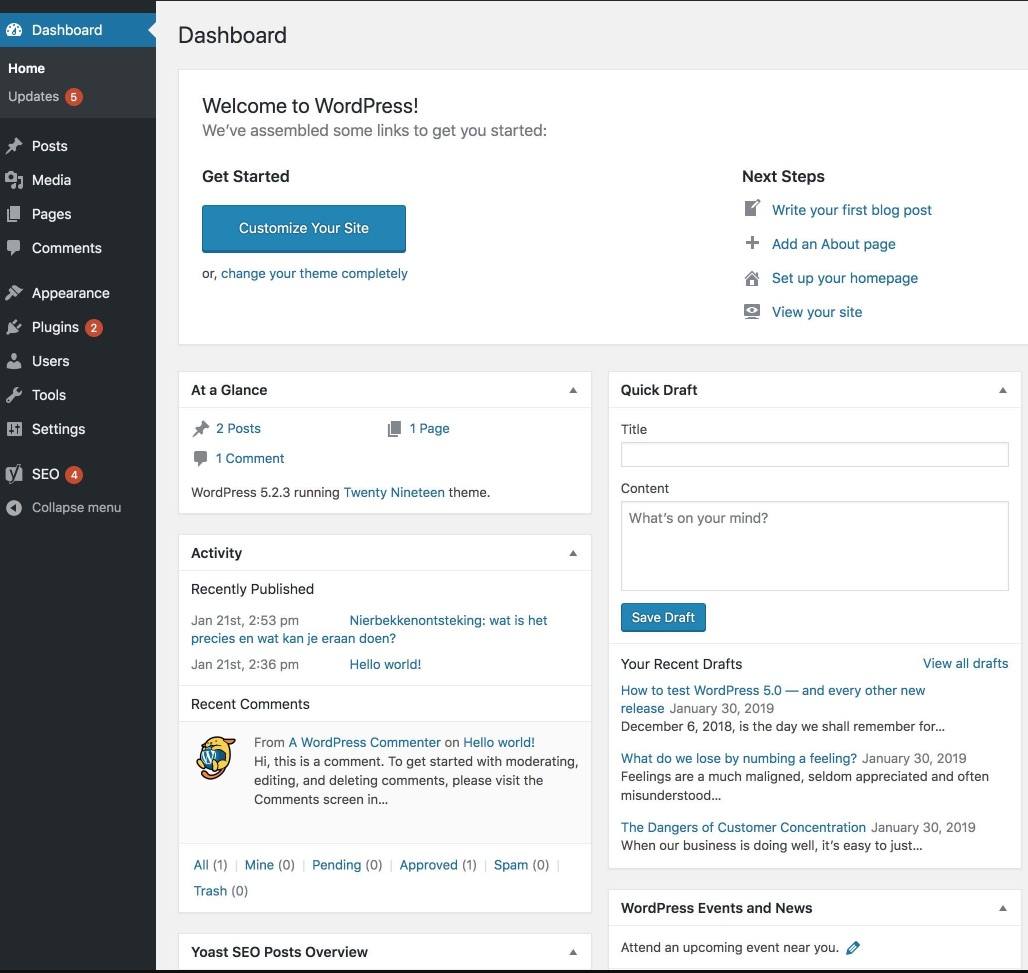
The WordPress dashboard is the first thing you see when you log into WordPress. From there, you see an overview of various dashboard widgets with relevant information. For instance, our Yoast SEO dashboard widget gives you a quick overview of the SEO health of your site. 

But if you’ve never logged into your WordPress dashboard before, finding it can be a little tricky. When you installed WordPress, you were guided into the WordPress dashboard automagically after the installation process. However, if you haven’t saved the URL of your WordPress dashboard, logging back in is not that easy. 

Luckily, there’s a solution that works for all WordPress sites. When you add /login/ or /admin/ to the URL of your site, you will be sent to the login screen. Upon logging in, you’ll be sent to your WordPress dashboard. So what does that look like? If your domain, for example, is everydayimtravelling.com, the login URL would become everydayimtravelling.com/admin/ and this will prompt you with the login screen. For future convenience, bookmark that page as soon as you’re logged in so you’ll even have a quicker way to log in.
4. How to install and activate a WordPress theme 

A theme governs the layout of your WordPress site. That includes, among other things, the appearance of your posts and pages, and the location of the menus and sidebars. Not surprisingly, finding the right theme is quite important for your website as it makes your site stand out from the masses. But, with so many choices out there, that may be harder than it seems. So, make sure to spend some time and effort and choose the best WordPress theme for your site.

Once you have chosen a theme, installing and activating it is easy. There are two ways to install a new theme in WordPress.

A. Installing a theme from the WordPress directory:

You can install a theme from the WordPress repository. In addition, it is also possible to buy premium themes from a variety of sellers. To install and activate a theme, follow these steps or check out the free WordPress for beginners course.

  1. Open the Themes overview screen
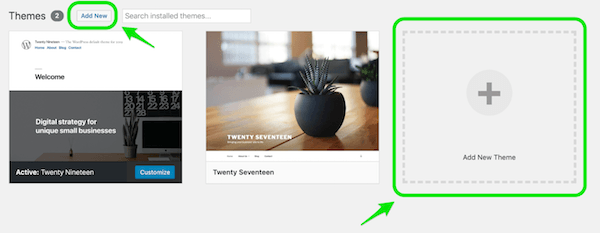
    In the admin menu in your WordPress Backend, click on Appearance, then Themes. The Themes overview screen will open. 
  2. Click the Add New button or the Add New Theme area
    At the top of the screen, you’ll find the Add new button. Alternatively, in the themes overview area, there is an Add New Theme square. Click on either one, to open the screen with available themes.
  3. Preview the theme
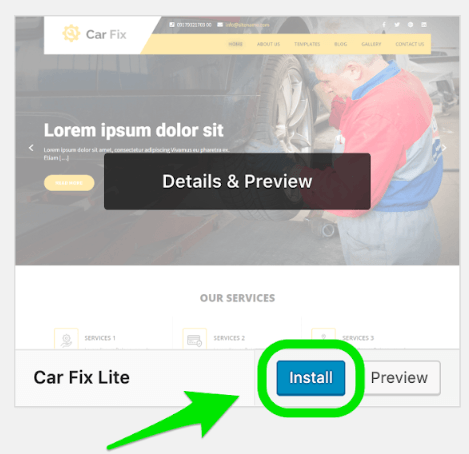
    Before you install a theme, it is a good idea to see how it looks on your site. You can do this by hitting the Preview button. Note, this is not an exact match of your site, but it does give you a really good idea if the theme fits your goals.
  4. Install the theme
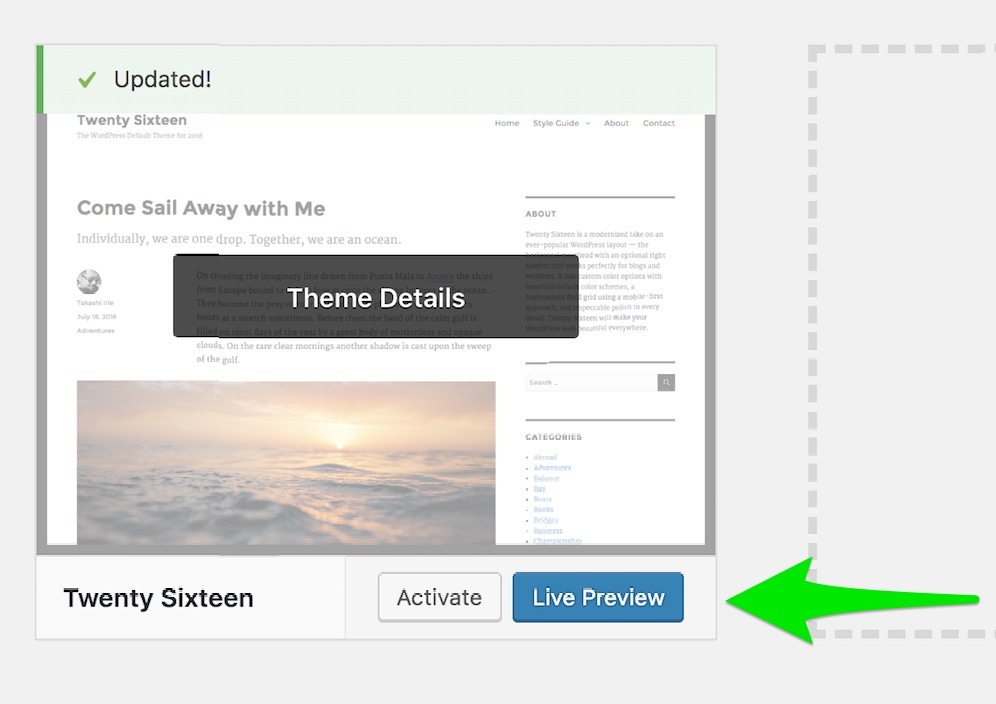
    Hover over the theme you want to use and click Install. The Install button will transform into an Activate button.
  5. Activate the theme
    Click the Activate button. The theme will be activated, and it will change the appearance of your website. 
  6. Go check what your site looks like on the front end!
B. Upload a theme

You can also add a theme that you’ve downloaded from outside the WordPress directory, this could be from one of the many online theme shops out there. The theme will have to be in a .zip format! To install and activate it, follow these steps or check out the free WordPress for beginners training

  1. In the Themes overview screen, click Add New
    Once you have accessed the Themes overview screen through the admin menu, you’ll see the Add New button at the top of the screen as well as the Add New Theme square in the area below. Click either one to open the screen with available themes. 
  2. Click the upload theme button
    At the top of the screen with available themes is the Upload Theme button. Click the button. You’ll see the new option to upload a .zip file.
  3. Click the Choose file button
    Once you click the button, a dialogue box will appear, that will allow you to choose files from your computer. Find and select the .zip file that you previously downloaded.
  4. Install the theme
    Click the Install Now button. Your theme will be installed and added to your themes overview.
  5. Activate the theme
    In the themes overview screen, hover over the theme, and click Activate. The theme will activate, and it will change the appearance of your website.
  6. Go check what your site looks like on the front end

Curious for more? Check out this lesson on themes of the free WordPress for beginners course.

5. How to install a WordPress plugin

Plugins can change or improve the functionality of your site in various ways. As a WordPress user, you’ll surely need to install a plugin at some point. How do you do that? Easy. You can do it in two ways. Either install a plugin from the WordPress plugin directory or upload a plugin you have downloaded from a third-party. Please note that only free and approved plugins are featured in the WordPress plugin directory.

A. Install a plugin from the WordPress directory

Let’s start by installing a plugin from the WordPress directory. Just follow these simple steps:

  1. Access the WordPress plugin directory
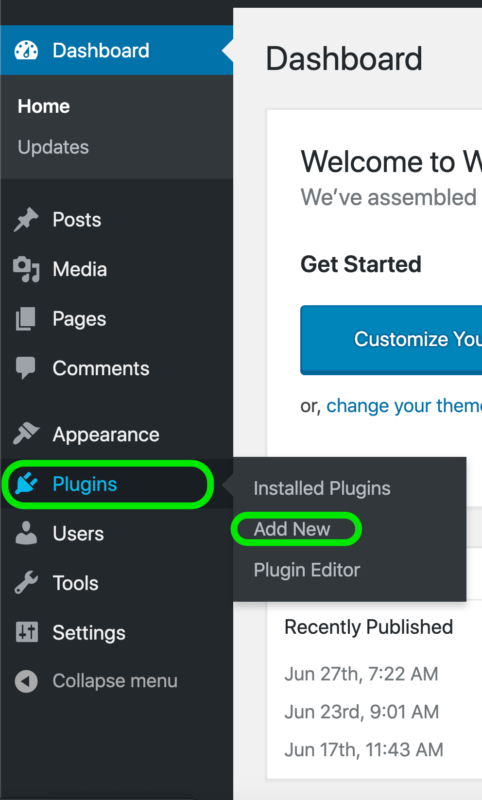
    In the WordPress backend, go to the admin menu. Hover over the Plugins menu item, and select Add New from the fly-out menu. The WordPress plugin directory will appear.
  2. Find the plugin you want
    Use the filter tabs in the toolbar, or search for plugins by typing in a keyword, author, or tag in the search box.
  3. Check the quality of the plugin
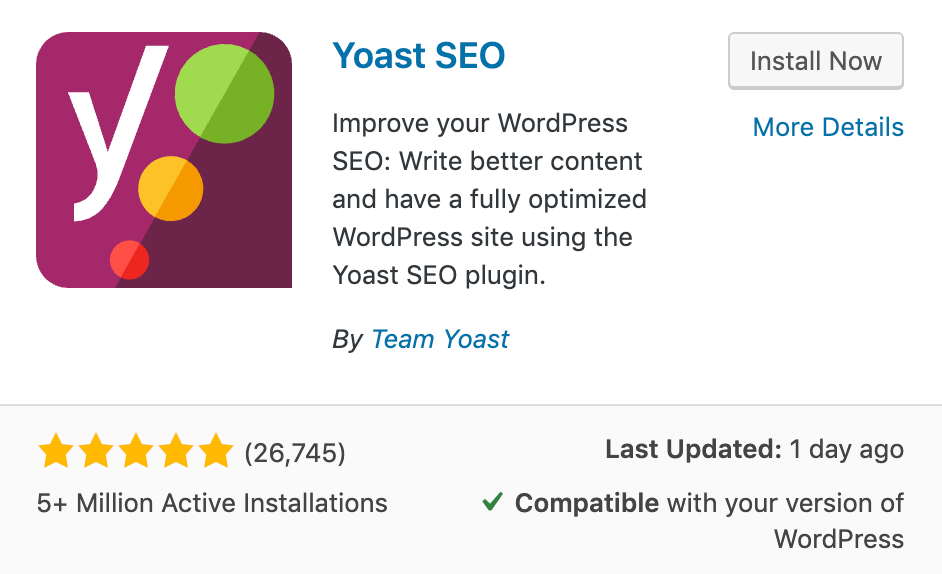
    Each plugin is featured in a box with basic information. A good quality plugin will have good reviews, a high number of active installations, frequent updates, and it will be compatible with your version of WordPress.
  4. Install the plugin
    Click the Install Now button in the plugin box. Once the installation is complete, the Activate button will replace the Install button. In addition, the plugin will appear on the Installed Plugins screen.
  5. Activate the plugin
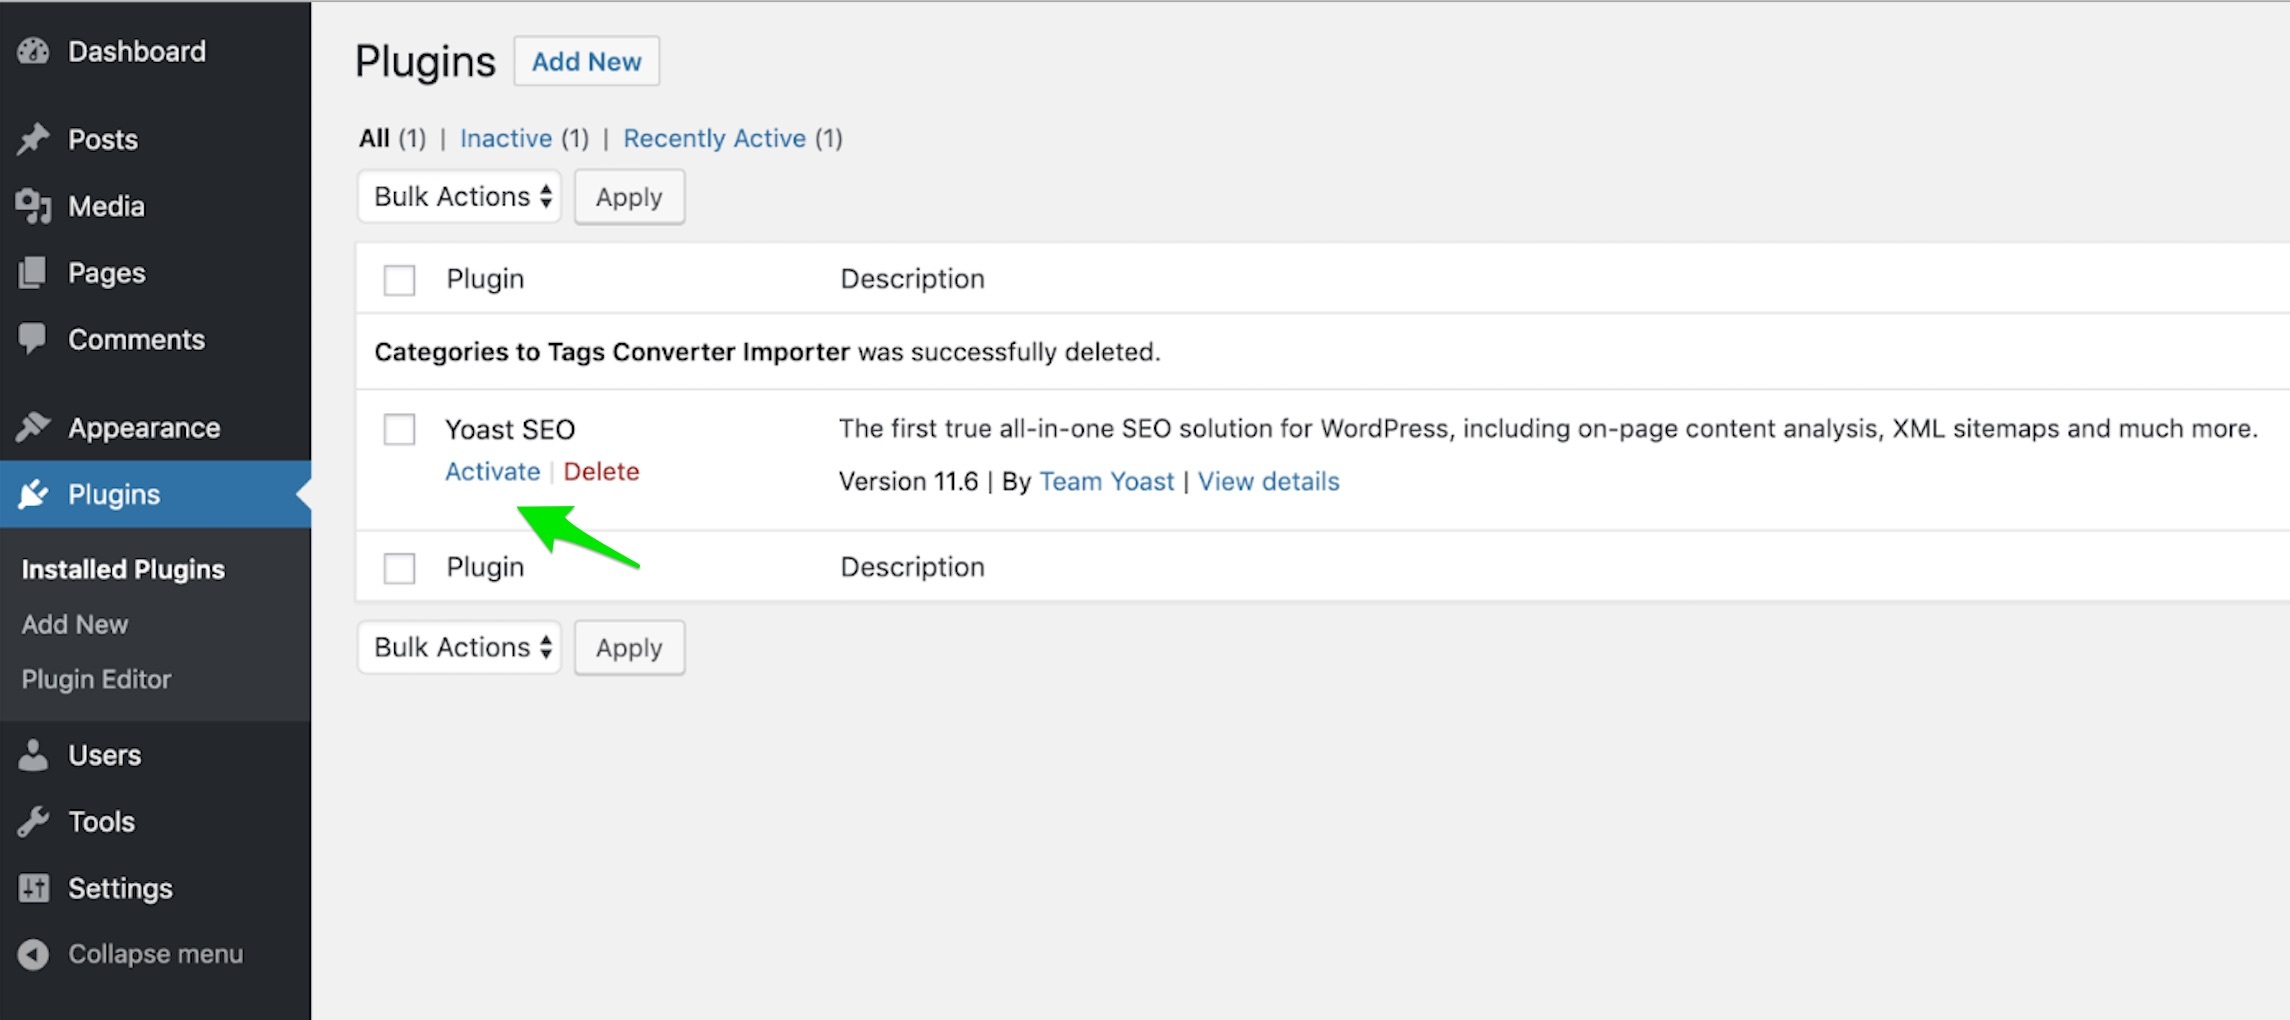
    Clicking Activate is crucial for the plugin to work. You can activate the plugin in the plugin box by clicking the Activate button when the installation is complete. Alternatively, you can click the Activate link in the Plugins overview screen.
B. Upload a plugin

The WordPress plugin directory has a lot of plugins, but it does not have all of them. You can also find some cool plugins on third-party sites like, for example, Yoast SEO Premium. But no worries, you can still easily add these plugins to WordPress. To upload a plugin to WordPress, follow these steps:

  1. Download the plugin from the third-party site
    Note that you will need to download the plugin in a .zip format. Otherwise, the upload may fail. If the plugin is not available for download in that format, contact the plugin provider.
  2. Access the WordPress plugin directory
    In your backend, go to the admin menu. Hover over the Plugins menu item, and select. Add New from the fly-out menu. The WordPress plugin directory will appear.
  3. Upload the plugin
    In the WordPress plugin directory, click the Upload Plugin button at the top of the screen. A new option will appear to add a file. Click the Choose file button, which will trigger a dialogue box to open. Find and select the file from your computer and click Open.
  4. Install the plugin
    Click the Install Now button, and the plugin will be installed.
  5. Activate the plugin
    Remember, you always need to activate a plugin after installing it. Go to your plugins overview, locate the plugin, and click the Activate link.

6. How to change the site title in WordPress

Setting your site title is an important step when creating your website. Your site title is the name that will show up at the top of the browser window, in bookmarks, and when people share your site on social media or via messaging apps.

To set your site title, select Appearance > Customize from your admin dashboard menu. 
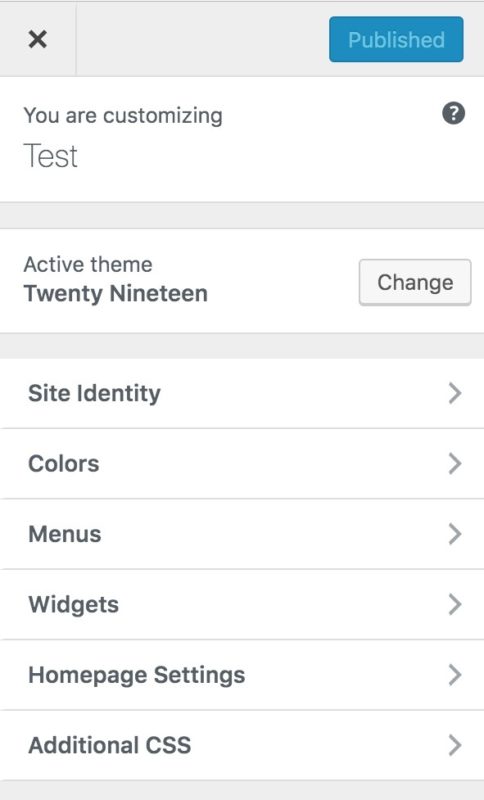
This will open the Customizer, which offers a lot of options to customize your site — as you may have guessed from the name. The option we need is right at the top, under Site identity > Site title. 
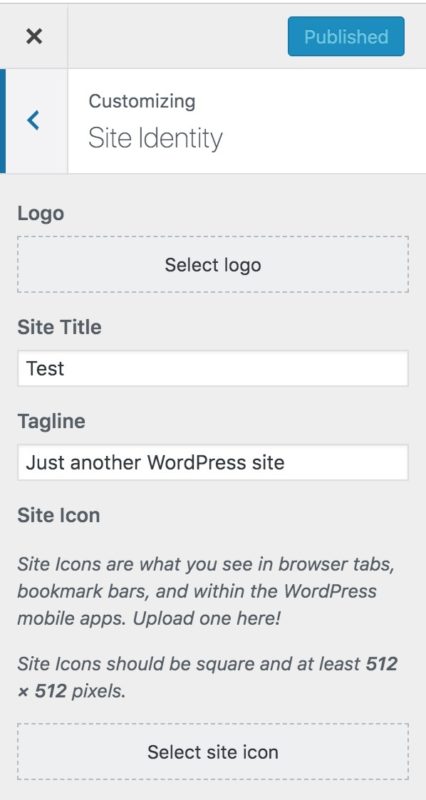
Enter the name you have chosen for your website, and if possible, try to keep it short. You’ll want to have plenty of space left in the search results to also display the title of your post or page. You can learn about why titles are important here.

And, while you’re there, make sure that you change your site’s favicon, which is called a site icon in WordPress. Find out how to do this in our step-by-step guide on changing your favicon.

7. How to add a page to WordPress

Pages form the backbone of your site structure. Naturally, it is quite important to know how to add a page in WordPress. Luckily, it’s quite easy. Just follow our instructions, and you’ll be adding pages to your WordPress site in no time.

To add a page, do this or check out the free WordPress for beginners training:

  1. Access the Page editing screen
    To access the page editing screen, hover over the Pages menu item in the Admin menu and choose the Add New tab from the flyout menu.
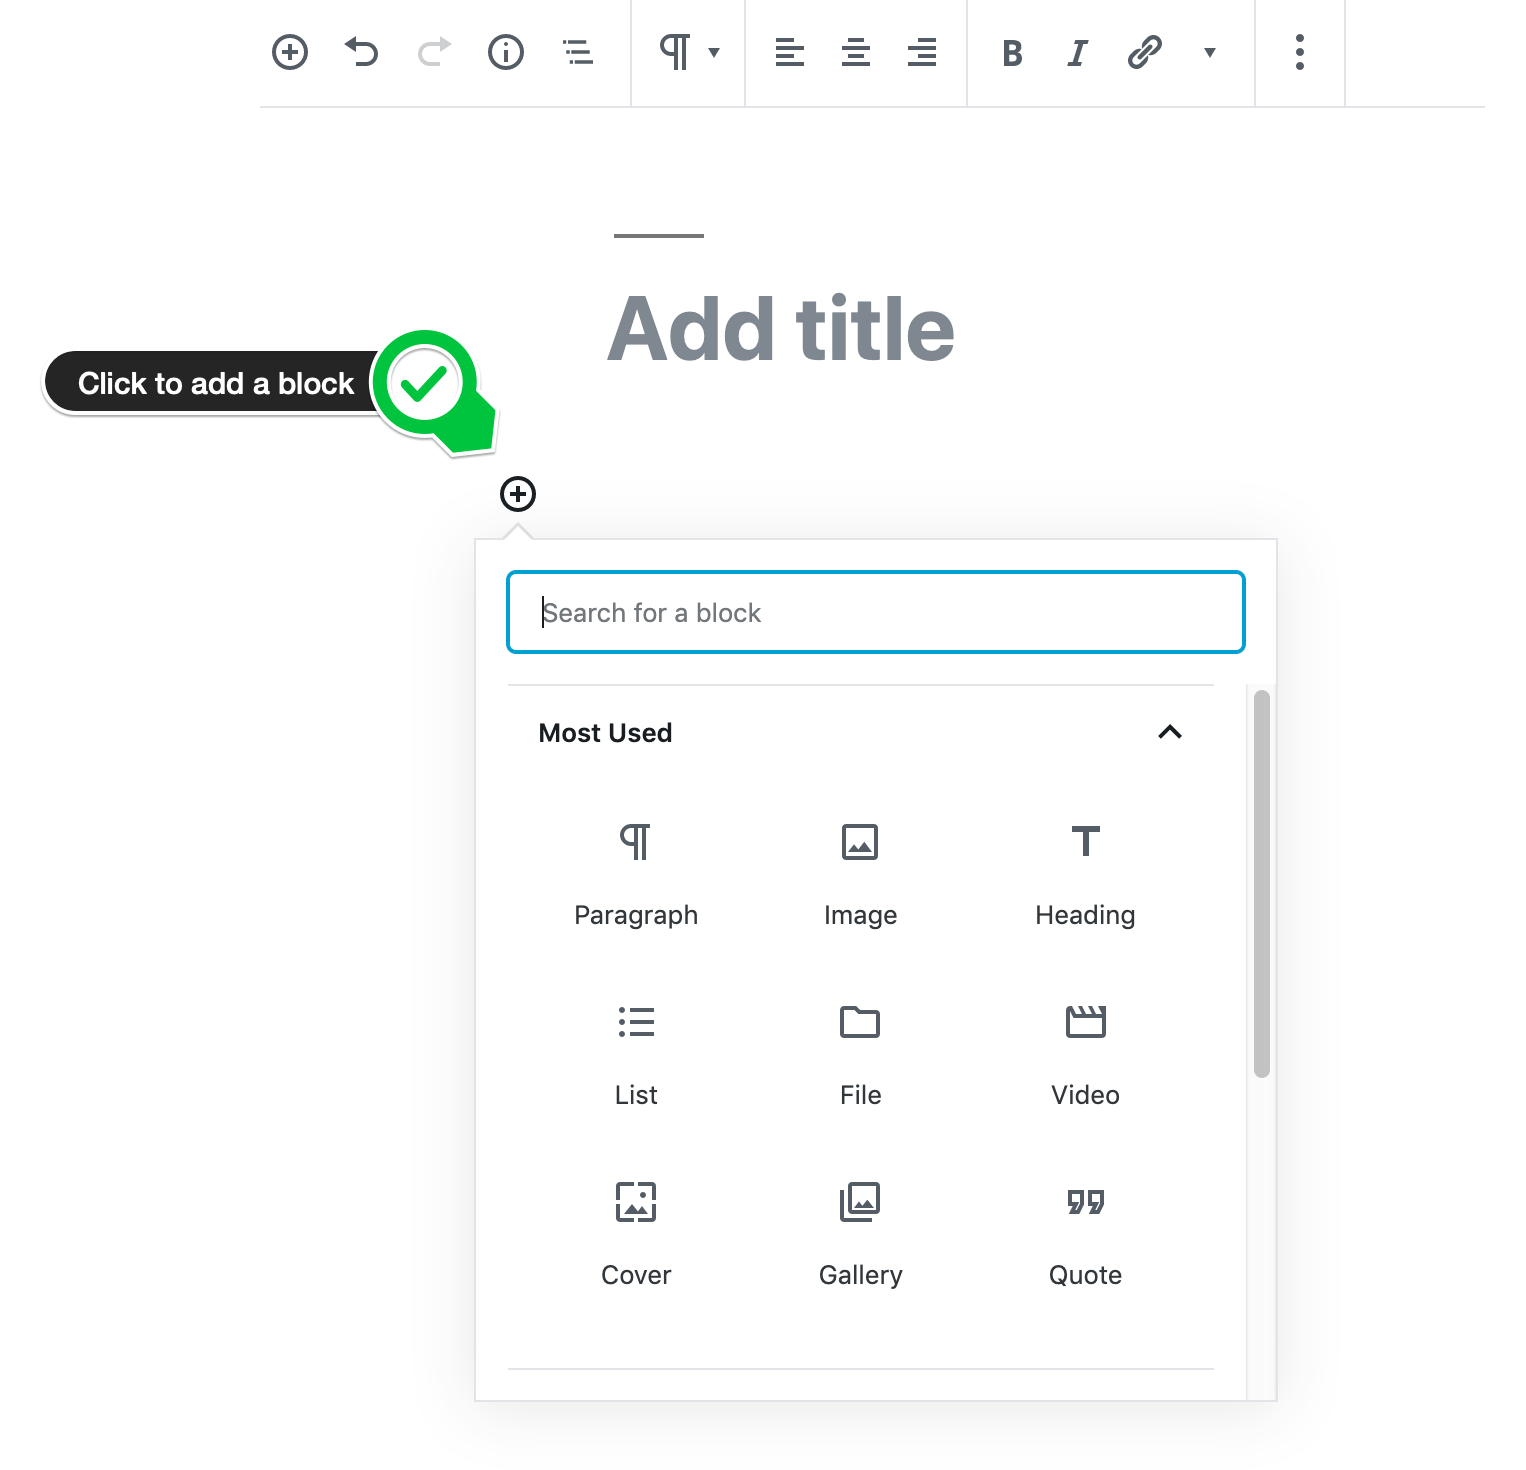
  2. Add a title
    In the editing screen, you will see a block with the text Add title. Add the title of your page there. Click enter to create a new block.
  3. Add content
    Add the content of your page by choosing the appropriate block. If you want to add text, choose the Paragraph block. To add a subheading, choose the Heading block. Choose an appropriate new block for each new type of content you want to add. For example, add an Image block for an image, or a Video block to add a video to your page.
  4. Preview the page
    When you’re done adding content to the page in the editor, we’d advise previewing what the page will look like on your site. To do that, click the Preview button in the top right corner of the screen.
  5. Publish the page
    When you’re satisfied with the preview, all you need to do is click on the Publish button. Your page will be published.
Curious for more? Check out this lesson on creating pages in WordPress of the free WordPress for beginners course.

8. How to delete a page in WordPress

You might think deleting a page from your site is as easy as just hitting that delete button. But with deleting a page, you’ll also delete one or more URLs. This usually results in a ‘404 not found’ error… Which isn’t great, neither for visitors, nor Google. 

So, think before you delete a page. You have two valid options after deleting a page: redirecting it to another page or showing search engine spiders a 410 header, which indicates the page is deleted intentionally. Redirecting a deleted page is the best choice when you have other content on your site that is similar to the deleted content. The goal still is to provide the user with the information he or she was looking for. If there’s no other page that answers the user’s question, you need to decide if you want to improve the existing page or show a 410 header instead. You can set such a header in code, but it’s much easier to do with one of the many redirect plugins for WordPress.

Redirect a page
There are different kinds of redirects, but a 301 redirect is what you should use when you redirect the deleted page to another one. This redirect, called a permanent redirect, makes sure the link value of the old page will be assigned to the new URL. You can redirect posts or pages easily with the Yoast SEO redirect manager, as it will ask you what to do with a URL when you delete a page. Just enter the replacing URL and you’re done!

Show a 410 Content deleted header
Is there no other page on your site that will give the reader the information he or she is looking for? Then it’s better to delete or improve that page. In case of deleting, you’ll need to send a ‘410 content deleted’ header. By using this HTTP status code, you’ll let Google know that you removed the URL on purpose and that Google can remove the URL from its index faster. In the  Yoast SEO redirect manager, you can also choose the option to show a ‘410 content deleted’ page after you’ve deleted a page.

9. How to change the font size in WordPress

What if the WordPress theme you’ve chosen is perfect — except for one little thing? The font size is just a little bit off. Do you need to find yourself a completely new theme because of this? Of course not! Changing the font size in your WordPress theme is relatively easy, but it does involve a little bit of CSS coding. We’ll help you! These are the steps you need to take to change the font size in WordPress:

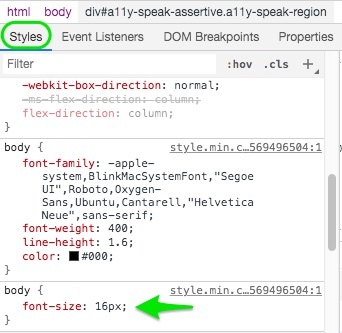
  1. First, you’ll have to identify what the current font size is. You can do this by opening the Inspector of your browser. When you right-click on the text you’d like to see in a different font size, you’ll be greeted with a menu that will have a direct link to your browser inspector tool. They look different from browser to browser, but they all work in a similar fashion. In Chrome, the menu item is called Inspect and in Firefox Inspect Element. Go ahead and click on that.
  2. Next up is finding the relevant CSS code that dictates the current font size. You’ll be looking for a section inside the Inspector you’ve just activated on the right-hand side of the screen called Styles. 
  3. Below that, you’ll see lines of code that match the element you’ve clicked on. You’ll see a line that has something like font-size: 14px or font-size: 1rem. 
  4. You can manually change the value of that line of code to, for instance, font-size: 16px. You’ll immediately see that change reflected in the open screen of your website. This is how you can check which value works best for you. 
  5. Once you’ve made up your mind on what you’d like to change it to, it’s time to write that down. You’ll also have to save the CSS element in which you changed the value. Most of the time this will be either a p or an h2 or h2 if you’ve selected a title.
  6. You’ll need to entire CSS code snippet for our next step, but it will look like something like this: p {font-size: 16px;}
  7. The next step is to navigate to your WordPress dashboard and find the Customize menu option inside the Appearance menu. 
  8. Click that and you’ll see a preview of your site on the right-hand side of your screen and a menu on the left-hand side. Inside this menu, you’ll find the Additional CSS menu. 
  9. Click on that menu option and you’ll see an input field. Here, you can paste the CSS snippet you saved earlier. As soon as you’ve pasted it, you’ll see the effects reflected on the right-hand side of your screen. 
  10. If it has the desired effect, go ahead and save your settings by clicking the Publish button inside the Customizer section. Afterwards, you click on the plus ( + ) sign in the top left-hand side of the Customizer to close the customizer screen. That’s it — you’ve now successfully changed the font size of your WordPress site.
Many themes have a so-called footer. The footer at the bottom of your pages is a good location to add some links to the less prominent content on your site, such as your address and contact information, terms of service and privacy policy. Not every theme has one, and the ones that do, often have different ways of activating and filling the footer. The Genesis theme, for instance, uses the Customizer settings to get this done, while other themes have a different setting for it. So, you best look around in the settings to find it. Here’s one of the most used ways of adding a footer to your theme.

  • Go to Appearance > Widgets from your admin dashboard.
  • On the left of this page are widgets that you can add to various places in your site’s theme. Those locations are listed on the right.
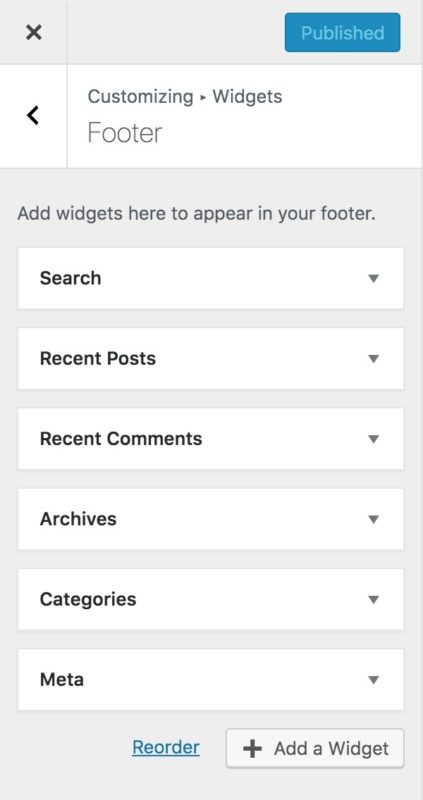
  • Find the widget that you want to add, and drag it to the location called “Footer”.
  • That’s it!

11. How to embed Youtube videos in WordPress

To really engage your audience, making your content visually appealing is key. One of the easiest ways to do this is by adding some images, or even a video. Embedding video hasn’t always been easy, but thanks to the block editor in WordPress 5.0, it is now! When you are editing a post or a page on your site, here’s how to do it:

  • Go to Youtube and find the video you want to add to your content.
  • Click the Share icon and copy the URL it displays.
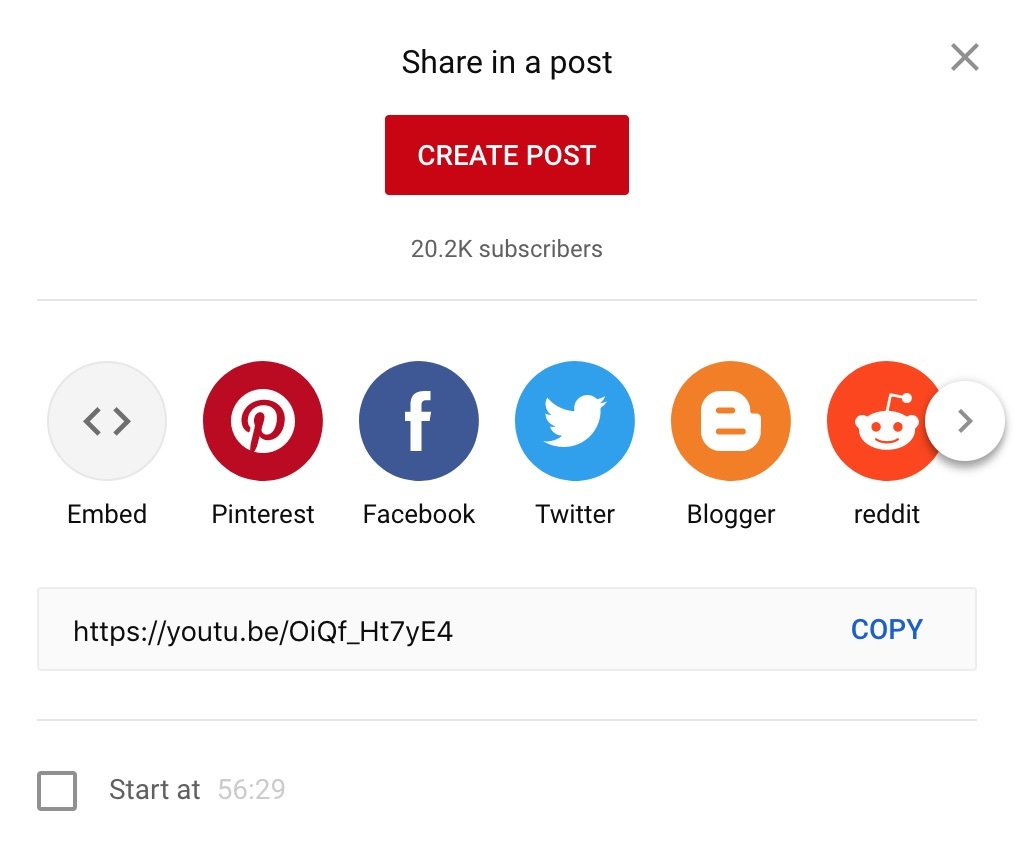
  • Open the post or page on your site you want to add the video to.
  • Press the + icon where you want the video to appear to add a new block.
  • Paste the URL of the Youtube video, and it should automatically convert to an embedded video!
  • If you want, you can change the styling of the video to make it stand out.

12. How to do SEO on WordPress

Search Engine Optimization (SEO) is the practice of optimizing your site and content to reach a high position in the search results of Google or other search engines. WordPress itself is already pretty SEO-friendly, but it still pays off to do WordPress SEO. Let’s look at a few important SEO aspects.

Technical SEO

An important first step to take when optimizing your WordPress site, is to make sure everything ‘under the hood’ of your website is in good shape. Technical SEO encompasses many things, such as:

Content SEO

Besides working on your site’s technical side, you should also optimize your content. There are three pillars of content SEO:

Holistic SEO

At Yoast, we believe in holistic SEO: ranking by being the best result. That’s why, in our opinion, flawless user experience (UX) should be part of your SEO strategy. We also believe that websites should be usable for everyone, which is why accessibility matters.

There are also outside factors that affect your (WordPress) SEO, such as link building, social media, and local SEO. We call this off-page SEO. While it can take some effort, working on this aspect of SEO for your WordPress site is also part of a holistic SEO strategy. 

Yoast SEO

As you can see, there are several sides of SEO, and it’s a lot of work to keep everything on track. Luckily, the Yoast plugin will help you work on many aspects, from site structure to content optimization to technical settings. That’s why every website needs Yoast SEO!

Keep reading: WordPress SEO: the definitive guide »

The post How to use WordPress: Answering 12 common WordPress questions appeared first on Yoast.

Syntax-highlighting Code Block, theme accessibility news and Gutenberg 6.2

After a short break, we’ve returned with a new WordPress Watch. In today’s edition, let’s check out a cool new way to share your code in the block editor. We’ll also look at some nice updates to the Gutenberg project – which includes new features for the block editor in the next major release of WordPress. And, there’s some news regarding accessible themes on WordPress.org. Here we go!

Syntax highlighting code in the Block Editor

Up until now, it’s still been kind of a pain to share code with proper syntax highlighting in the Gutenberg block editor. I say up until now because Weston Rutter released a cool plugin that takes care of this wonderfully now.

Weston, who works at the WordPress team at Google, created a plugin that works in a very smart way. It doesn’t require extra JavaScript to be loaded to display the syntax highlighting. And, it works by extending the default WordPress code block. Additionally, you have a whole bunch of options to define what the syntax actually looks like. For instance, if you want it to look like how Github does its highlighting, that’s totally possible!

Interested to learn more? Check out the Syntax-highlighting Code Block plugin page.

WordPress.org themes see accessibility updates

The WordPress Theme Review Team has been pushing the standards towards better quality themes for a while now. One aspect that receives a lot of focus is the accessibility of the themes available on WordPress.org.

For example, the TRT recently announced that all themes will be required to add keyboard navigation. Another example is the requirement to include skip links.

Now, having Accessibility requirements is great, of course, but seeing them implemented by theme authors is where it’s at. I’m really happy to see tweets like this one by Alexander Agnarson from Alx Media, announcing that all of his themes are now making use of skip links. You can check out his themes here.

Gutenberg 6.2

We saw the release of Gutenberg 6.2 and with it came two new features that were added based on community feedback. The Cover & Image+Text blocks now allow for nesting any type of block inside.

Up until now, you could only add three specific elements. Namely, a button, heading, or paragraph block, to the Cover block. This resulted in people hacking their way around these restrictions.

The solution was fairly simple -removing the restrictions was basically all it took- and now users have greater flexibility in creating versatile Cover blocks.

The post Syntax-highlighting Code Block, theme accessibility news and Gutenberg 6.2 appeared first on Yoast.

WordProof, CoBlocks update, Genesis framework 3.0 beta and more

Another week, another news roundup! In this edition, we’ll cover an interesting solution to really authenticate your content. I’d also like to highlight a tutorial on how to add AMP to your site and a cool gallery block enhancing plugin. And there’s more, so let’s get started…

Time-stamping your content with WordProof

In this day and age where #fakenews is rampant, proving the authenticity and integrity of your content has become paramount. In some cases, you may even need to comply with privacy policy laws. Up until now, setting this up for your WordPress blog was extremely laborious and difficult to do.

WordProof solves exactly this problem by time-stamping your WordPress content to the Blockchain. And yes, this is the first real-life application with the blockchain that actually makes sense to me. All you need to do is install their plugin and follow the instructions to connect your site with the blockchain.

CoBlocks update

If you hadn’t noticed before, I’m a big fan of what Rich Tabor, now at GoDaddy, has done with the Block Editor enhancing CoBlocks plugin. Especially their galleries solutions are aces.

Yes, you read that correctly, the CoBlocks plugin comes with several variations, with different types of enhancements to the gallery block. They released their 1.10 version, which polishes the blocks even more, has easier maps, Form Block Spam Protection, and more. So, check out the plugin if you haven’t yet.

AMP your site up the right way

Bill Erickson walks us through building a Native AMP site. His tutorial takes the perspective of doing this in the Genesis Framework. But, don’t let that stop you from learning from it.

Genesis Framework 3.0 beta released

Genesis 3.0 will be the first big release in years. Since Genesis is already 9 years old, there were definitely things that could be removed and improved. The entire theme has been overhauled and, for instance, the blog template will be removed entirely.

One of the things which will be added to Genesis 3.0 is the integration with AMP. Which means that Bill’s above-mentioned AMP tutorial is actually easier to do with Genesis 3.0. You can try out the 3.0 beta and see for yourself.

Bonus links

  • WP Engine released a beta package of curated development tools. It’s called the DevKit and includes a local development environment, Genesis-specific functionality, and a wealth of other inclusions. It’s all geared towards helping you create and debug WordPress projects.
  • Gutenberg 5.9 was released and it adds a new type of notices called ‘Snackbars’. A ‘Snackbar’ displays a succinct message that is cleared out after a small delay.
  • The XML Sitemaps Feature Project Proposal was published. It’s a joint effort between us (Yoast), Google and various other contributors to get the sitemaps into WordPress Core.

The post WordProof, CoBlocks update, Genesis framework 3.0 beta and more appeared first on Yoast.

Happy sweet 16 WordPress, microblogging and Hello theme launch

We have a wide arrange of topics to discuss in this roundup. Everything from a perfect microblogging theme, to spinning up your WordPress hosting environment and lots in between. And, there are even some bonus links this time. Let’s dive in!

Happy Sweet 16 WordPress!

Today is an extra special day in the land of WordPress. It’s the 16th birthday of WordPress. It’s been 16 years since Mike Little and Matt Mullenweg released the first release of WordPress.

Elementor launches Hello theme

One of my favorite theme builders, Elementor, launched a theme in the WordPress repository that is fully compatibility with Elementor called Hello. It’s both a clean and lightweight theme that allows you to fully build the site whichever way you like.

For those of you wondering if there’s a place for Page Builders in this block-based editor era, I’d encourage you to play around with the Hello theme and the Elementor plugin and see for yourself. Both are freely available from within your WordPress Dashboards.

SpinupWP out of beta

About six months ago I mentioned an alternative solution for self-hosting your WordPress sites called SpinupWP. Last week, after having two developers working on it full-time for 15 months, 400 hours of design, and 300 beta users for six months, they finally launched out of beta. If you’re in the market for self-hosting your sites, you should check them out!

Microblogging

You might think that the only place where microblogging can take place is Twitter or Instagram, for instance. Well, microblogging – short messages that come in the form of a variety of content formats, including text, images, video, audio, and hyperlinks – also have a place in our favorite CMS: WordPress.

All you really need is a theme that makes your microblogging shine. And the Davis theme created by Anders Norén does exactly that.

Disable the WordPress blog

What if the site you’re building has no need for a blog? Well, there’s a plugin for that! The Disable Blog plugin to disables the blog functionality of WordPress. It does this by hiding admin pages and settings. It also redirects pages on both the front-end and admin side. Perfect for that static site you’re building.

Bonus links

  • When you want to share blog posts on social media, you need an image that matches your post. However, creating images for social media can be a pain. It is exactly this problem that Placid is trying to solve. It’s a premium solution, but it may be just perfect for you.
  • If you’ve ever needed a solution to create beautiful footnotes for your WordPress site, look no further. Footnotes Made Easy is the perfect, Gutenberg ready plugin for this.

The post Happy sweet 16 WordPress, microblogging and Hello theme launch appeared first on Yoast.

Theme news, tutorials, ACF, and WordPress update

Today’s roundup focuses on some theme related news items, as well as some tutorials and a lot of ACF goodies. But, don’t worry, I’m also bringing you up to speed on WordPress 5.2 and the new Gutenberg update. Would be weird if I didn’t, right? ?

Genesis 2.10

The Genesis framework saw a nice update to version 2.10 last week. The most important features that were added in this update were WP-CLI commands, improved navigation, increased visibility into Genesis plugins, and easier access to the settings and features. Check out the 2.10 release post for more in-depth information about this release.

Disable Genesis schema markup

If you’ve been using Genesis because of its rich schema markup alongside our Yoast SEO plugin, you may now want to disable Genesis’ schema markup altogether so Yoast SEO can provide everything instead (see the Yoast SEO 11.0 update post for more information about why). To disable Genesis schema, Bill Erickson released a small but effective plugin that does exactly this for you. You can learn all about it in Bill’s post.

Exhale with Justin Tadlock

Justin Tadlock is probably the one I learned from the most about building themes. He’s been around since 2008 and has always produced solid content in the shape of tutorials. Justin recently released a new theme called Exhale which he is using to base a couple of child themes on.

What I really like about Justin’s approach is that he immediately teaches you what he has learned through his blog posts. He has already posted a couple of tutorials on ThemeHybrid’s blog that show you what you can do with a theme that’s making good use of Gutenberg. For instance, how to create an app sales landing page, a cafe landing page, or a business landing page.

Justin’s looking for inspiration to create more of these kinds of landing pages, so if you have an idea, go and respond to his tweet:

ACF and flexible content

Speaking of landing pages. Bill Erickson, yes, the same guy I mentioned earlier in this post, wrote a nice tutorial on how to use ACF to create more flexible landing pages when Gutenberg blocks just don’t cut it.

Bill does a great job explaining in great detail how to approach this. I’m a big fan of Bill’s tutorials as he (just like Justin Tadlock) really takes the time to explain everything step by step.

But there are even more options with ACF.

ACF Blocks

ACF makes it super easy for you to create blocks, and if you prefer not to touch code, you’re in luck. ACF just released ACF Blocks, which is a collection of Gutenberg Blocks. It helps you speed up website creation in the Gutenberg editor. ACF Blocks is built on-top of Advanced Custom Fields Pro. Do note, that this plugin requires the ACF Pro version of the ACF plugin to function correctly.

WordPress 5.2 RC2

If everything goes according to plan, the WordPress Core Team will release WordPress 5.2 this week. They’ve already released the second Release Candidate, so if there are no more blockers, it will be released this week.

Gutenberg 5.6

The work on improving the Gutenberg editor is continuing relentlessly. We saw the release of version 5.6 last week. With the most important updates being a number of improvements, including to the button block focus states, theming, and block mover controls with full- and wide-aligned blocks. Per usual, you can learn more about it here.

The post Theme news, tutorials, ACF, and WordPress update appeared first on Yoast.

New roles in the WordPress project, blocks and WordPress 5.1

Today’s roundup is a nice collection of interesting things that happened in the WordPress Community in the last couple of weeks. There’s some very exciting news about expanding the WordPress leadership team and I’ll discuss a couple of new features of the next version of WordPress.

Expanding WordPress Leadership

Matt Mullenweg published a post this week on the Make WordPress site where he announced two new roles to be added to the WordPress Leadership team. The first new role is that of Executive Director and will be taken on by Josepha Haden. The second role is that of Marketing & Communications Lead and our very own Joost de Valk will be taking on that role. This is what Joost had to say about it:

WordPress is paving the cowpaths for the web with projects like Gutenberg, I’m looking forward to leading marketing & comms for WordPress and working with everybody to tell the story of this awesome project and community.

Both new roles combined mark a great step forward for the growth of the WordPress Project as a whole.

Genesis 2.8 introduces Gutenberg based onboarding feature

Genesis, the leading theme framework, has introduced an onboarding feature that is based on Gutenberg. Basically, a set of preformatted and configured blocks (called Block Templates) are made available when you activate a Genesis Child Theme. This is what they had to say about it in the Genesis 2.8 announcement post:

Genesis 2.8 includes a new onboarding feature theme that authors can use to define which demo content is loaded when a user installs a new theme. One-Click Demo Install makes it easy for theme authors to load in plugins and perfectly-designed Gutenberg blocks onto the home page of a new site using that theme.


The Gutenberg project may have had some people doubting over the need for a new editor, but integrations like this – alongside an improved editing experience – that make it awesome. And this is only the beginning: it’s one of the first types of integrations like this.

Block plugins

In fact, there are already a couple of really interesting plugins out there that provide for extra custom blocks. We, of course, have our own Yoast SEO How-To and FAQ block (and there are many more on their way), but here are six interesting block providing plugins you should definitely check out:

As I’ve mentioned in a previous roundup, WordPress.org has a dedicated view for plugins that provide blocks as a library or as an enhancement to their already existing core functionality. You should definitely check that out if you haven’t already.

What next for WordPress 5.1

The next WordPress release is called 5.1 and is scheduled for the 21st of February 2019. The work for 5.1 began long before the launch of WordPress 5.0 and therefore it’ll have two very interesting features:

Fatal Error Protection

WordPress 5.1 will introduce a so-called WSOD protection (white-screen-of-death protection). This feature will recognize when a fatal error occurs, and which plugin or theme is causing it. With this new feature, you’ll still be able to access the WordPress Dashboard and the respective plugin or theme will be paused. This allows users to still log in to their site so that they can at least temporarily fix the problem.

PHP upgrade notice

If your site is still running on an old and insecure version of PHP, WordPress 5.1 will let you know after the upgrade. The lowest PHP version still receiving security updates is currently 7.1. This means all the PHP 5.x versions are outdated and insecure and the PHP upgrade notice is intended to get people to have their hosting companies change the PHP version. With the latest PHP versions seriously boosting your performance as well, trust me, you want to be on the latest and greatest, as it will make your site faster.

You can read more about these features in Felix Arntz’s introduction post on the Make WordPress Core blog. And that’s it for this roundup. What are you most excited about?

The post New roles in the WordPress project, blocks and WordPress 5.1 appeared first on Yoast.

Ask Yoast: Not much above the fold in Twenty Seventeen?

“Above the fold” is a term originating from newspaper and tabloid design. It refers to the upper half of the paper that shows the most important news and photos of the newspaper. In web design “above the fold” means the part that you can see without scrolling down the page. Guidelines often state that your most important message should be above the fold. However, the Twenty Seventeen theme just allows for a large image, and we received a question about that at Ask Yoast:

Ruth Maude emailed us about the Twenty Seventeen theme – the new default theme for WordPress:

“We’ve always told our customers that their main message and call-to-action should be above the fold. The new WordPress Twenty Seventeen is all image above the fold. Isn’t the fold important anymore?”

Check out the video or read the answer below!

For good SEO, you need a good user experience. Learn about UX & Conversion! »

UX & Conversion from a holistic SEO perspective$ 19 - Buy now » Info

Not much action above the fold?

In the video, I’ll share how I feel about “above the fold” nowadays:

Well, Ruth, you’ve hit my single most important issue with the Twenty Seventeen theme. It’s just too big. I think something should be above the fold too. At the same time, what’s really most important is that you show people that there’s a way to scroll. If people see that there’s a way to scroll on your site, they will scroll and they will find that other stuff, if you’ve made it interesting enough for them. So really good imagery is what Twenty Seventeen is all about. That can really help. And it can give a sort of interaction with a user that can be pretty good. But I wish there was a bit more action above the fold on 2017 too. We agree.

Good luck!”

Ask Yoast

In the series Ask Yoast we answer SEO questions from followers. Need some advice about SEO? Let us help you out! Send your question to ask@yoast.com.

Read more: ‘How to find the perfect WordPress theme’ »

How to reduce HTTP requests to speed up your WordPress site

Having a website, online shop or blog that’s fast is a must nowadays. A fast website doesn’t only give your visitors a much better experience, but it also helps your website to rank. Sending fewer HTTP requests to the server can improve the loading times of your website. But why is that?

What are HTTP requests?

HTTP requests are requests that get sent to the server whenever someone visits your website. These requests can contain a variety of information for the server to process and act upon. The most important part of such a request is the URL. Based on this information, the server will try to return a valid response, such as a file. The first stable implementation of HTTP, HTTP/1.0, does these requests in series. This means that a group of requests needs to be finished before the next group is sent. Obviously, this means that pages with a lot of external files will suffer from longer loading times, making your website slow.

Speeding up initial loading times

As described in the previous section, loading a lot of files one after another will result in longer loading times. Now you might be wondering “How do I speed this process up?”. Luckily, there are a few techniques and advancements in browser technology that can help you with this.

Order a website review and get a plugin of your choice for free. We'll even configure it for you »

Get a Yoast website review€ 699 - Buy now » Info

Browser pipelining

Since the introduction of HTTP/1.1, it has been possible to use a feature called “browser pipelining”. This feature allows the browser to fetch multiple files in rapid succession, without waiting for a previous request to finish. This means that the browser doesn’t have to wait as long to send off the next request.

In theory, this would be a very handy feature to have enabled by default. Sadly, in practice, this system still has some flaws. Due to its asynchronous nature, it’s possible that files load in the wrong order.

Let’s take a custom jQuery plugin as an example of how browser pipelining could do more harm than good. As your custom plugin depends on jQuery, the jQuery library needs to be fully loaded before your plugin can properly run. You might already see where this could go wrong; because browser pipelining doesn’t wait for previous requests, your plugin could load before jQuery. The result? JavaScript errors.

This problem with load order can also easily occur with something like images. In the case of images, it’s possible that the order in which the images get displayed differs from the actual order in your HTML.

HOL blocking

Another phenomenon that sometimes occurs when using browser pipelining is Head-of-line blocking (HOL blocking). What this means is that a particular packet (a part of a file) is keeping another packet of the same file from successfully completing. Other packets can only continue on their way once the delivery of the first package to the browser ends.

Due to the issues mentioned, most browsers disable HTTP pipelining by default. In the latest version of HTTP, aptly named HTTP/2, the issues with pipelining are addressed by using a technique called multiplexing which sends multiple HTTP requests over a single TCP connection. If you want to use this technique, make sure your server and your audience’s browsers, properly support HTTP/2.

Move JavaScript files out of the head section

There’s another way to make your website to load faster without much extra hassle. But first a brief history lesson!

Placing all the required CSS and JavaScript in your <head> section used to be considered common practice. However, the problem with this technique is that the rest of your HTML won’t display because these files block its rendering. This results in your visitors looking at a blank page for a couple of seconds.

As early as 2007, a new best practice surfaced. This best practice recommends moving all the JavaScript from your <head> section to the bottom of your page, just before the </body> tag. Why? Because JavaScript blocks any further rendering of a page until it has loaded all its files. By moving the JavaScript, the page’s HTML renders first instead of last. Sometimes it’s possible that you want the rendering of the page to wait until a particular JavaScript file loads. This would be the only exception when it comes to moving files out of the <head> section of your HTML.

Moving CSS to the bottom of the page is not recommended, as it stops the browser from correctly displaying and formatting your content. This impacts the overall user experience. Nobody wants to visit a website where text jumps around the screen because a stylesheet doesn’t load until the very end. Although moving your JavaScript to the bottom of your page doesn’t reduce the number of HTTP requests, it does help improve the overall experience.

Reduce the number of files

Another option to speed up your website is by limiting the number of files that load. This is because for every file you try to load, your browser sends a separate HTTP request to the server. Fewer files means fewer requests and therefore a faster website.

Most commonly, JavaScript, CSS, and images are the main culprits when it comes to slow loading pages. To combat this, you can use a few techniques, namely:

Minifying and concatenating your JavaScript and CSS files.

By minifying and concatenating assets such as CSS and JavaScript, you not only reduce the overall file size, but you also minimize the amount of files that need to load. A good rule-of-thumb is to group files based on their respective functions; if you have multiple files that do something with image manipulation, it might be a good idea to concatenate those.

Additionally, by limiting the amount of CSS files that load initially, you reduce the overall loading time. In that case, minification and concatenation can help as well. After the initial loading of CSS files, your browser caches it so subsequent requests shouldn’t take up as much time. You can imagine that having a single file with all the relevant CSS, plus the caching, can significantly improve the overall experience.

If you have CSS that is very specific for a particular page, you’re better off loading that file separately. As a result, you won’t unnecessarily ship specific CSS rules that aren’t used elsewhere in your HTML.

There are plenty of online tools to help you with minification and concatenation during development. You can also use a plugin, such as WP Rocket, to help you out with this.

Optimizing images

Some themes are heavily dependent on pictures. Because images are also separate files themselves, they too fall victim to the limitations of HTTP. To get around this, it is possible to make use of a technique called CSS spriting. This technique allows you to take multiple images (usually of a similar size) and reduce them into a single image. Then with some smart CSS techniques, you manipulate the sprite and only display a specific part of it. There are a couple of online tools that can help with this, such as SpriteMe. It’s unnecessary to create sprites for _all_ your images, but it’s worth putting in the extra effort for things like backgrounds and social media icons.

Lazy loading

Another way to ensure images won’t make your pages slow, is using a “lazy loading” plugin. Lazy loading is a technique where some JavaScript looks at the current viewport of the visitor and only loads images that are (almost) within view. A good plugin for this is the Lazy Load plugin which delays loading of images until the user starts scrolling down the page.

Bonus tip: use a CDN

Finally, here’s an extra tip. Content Delivery Networks, or CDNs, are a network of optimized servers across the globe that guarantee fast delivery of static content such as images, CSS and JavaScript. The main advantage of using a CDN is that you’re retrieving content from a separate server. This overcomes one of the HTTP restrictions which limits sending a large amount of requests to a single server in one go. By overcoming this restriction, you can achieve shorter loading times! Another advantage of these CDN’s is that the data comes from a server closest to your visitor’s physical location. Shorter distances to the server means faster data retrieval. It’s possible to use more than one CDN, which means your browser can deal with even more HTTP requests at the same time.

Here at Yoast, we use MaxCDN (affiliate link), but with the rising popularity of CDN’s, there are plenty others to choose from. Once you’ve found a CDN provider of your liking, using a caching plugin like WP Rocket can help you to configure your CDN for your website.

Conclusion: Reduce those HTTP requests

As you can see, plenty techniques are available to decrease the loading time of your website. By far, the biggest improvement you can make is reducing the amount HTTP requests you send to the server. Additionally, making the files smaller through minification can also help speed things up.

So, go forth and optimize your CSS and JavaScript! Lower those HTTP requests! Your visitors and servers will thank you for it.

Read more: ‘Site speed: tools and suggestions’ »

Recent posts and comments for WordPress

recent posts commentsWhen I was writing the chapter about internal links for our ebook, I also mentioned Recent Posts and Recent Comments. But these subjects were mentioned only very briefly. It seems so logical to add these for any blog, that it didn’t seem necessary to use more than a page to explain these. But if it is common sense to me, is it to everyone? My post about Common sense for your website taught me it isn’t. And if it is for you, it won’t hurt to emphasize that common sense.

In this post I will discuss a number of common internal links that can easily be added via WordPress itself. Or any plugin that is created up for the purpose.

Recent posts

For any website with a blog, adding recent posts or a section with a selection of links to posts (examples listed below) can be a valuable asset. We do that on our website as well. It’s an easy way of telling your visitor:

  • about recent market developments;
  • about recently added information to your website that might be of interest for him or her;
  • about new products or services your company offers;
  • or simply to let your visitor know that you have a blog.

versatile recent postsThis section usually consists of a simple list of links. WordPress offers this functionality by default like shown in the image on the right (this is actually in our Versatile Theme). But to be honest, even if you are less technical, you can create a nice PHP snippet using the examples WordPress gives for the wp_get_recent_posts function. If you prefer shortcodes, I recommend Bill Ericksons’ Display Posts Shortcode plugin.

Just recently, I also started playing with this very customizable plugin called Recent Posts Widget Extended. This plugin is very customizable right from the Appearance > Widget section in WordPress. If you don’t want to use shortcodes in widgets and prefer a customizable recent posts widget, you should really try this plugin.

There are many variations to the recent posts links:

  • Related Posts: usually below the actual article. Very helpful for people that want to read related posts if they like (the subject of) your article.
  • Featured posts: link to your main posts, best read articles or posts that relate to recent market development, for instance by linking to the most recent posts in a category.

Besides that, in the previous examples you can of course replace ‘post’ with ‘products’, and all will make sense as well.

Recent comments

You have to think about this section. If you add a recent comments section and your last comment is dated 2013, that will immediately add an expire date to your website as well. Apparently you haven’t written anything interesting last year?

But if you have comments on all your posts (thank you, valued commenters on this website) and you write articles on a regular basis, the recent comments section will be very valuable. Comments allow for keyword variations, as a visitor might have used a different keyword than the one you are using over and over on your blog. Next to that, and more importantly, a recent comments section will show your visitor you have a vivid and engaging reader base. Meaning you must have something interesting to say.

Note that in most cases you want to limit the number of links on your page (we aim for max 50 links per page), so the link value per link will be best. That might be a reason to choose between recent posts or recent links in your sidebar. In that case I would recommend recent posts. The reason for that is simple: If you have a vivid blog, chances are all recent comment links will go to the same page :)

WordPress has a function for recent comments as well: get_comments. It’s highly customizable, by the way. It’s really easy to display for instance just the comments made in the last week. As I don’t have any experience with plugins that can help you with these recent comments, I’m looking forward to any suggestions you might have.

Like with the recent post alternatives, something similar to the recent comments could be recent reviews or testimonials. Both are user generated content of course. In a recent project I found this plugin for testimonials very useful. It adds schema.org, for instance. If you are looking for a nice way to add testimonials to your WordPress site, be sure to check it out. It’s a new kid on the block, only released in May 2014, but I really like it!

Closing thought

Recent posts and recent comments are valuable internal links for any website. There are many ways to add these and it isn’t that hard to do. If you feel people aren’t visiting or even finding the blog on your website, you should simply add a small widget to your sidebar and see the traffic grow!

This post first appeared on Yoast. Whoopity Doo!

Regular security audits: taking our responsibility

Yoast SecurityToday, we’re announcing that we have partnered with Sucuri, in the interest of pro-actively securing our plugins. As our plugins run on more and more sites, we have a responsibility towards our users and the web at large to make sure that we do our utmost to make sure our code doesn’t make them vulnerable.*

We’ve been preparing this release for over two months. In that time, Sucuri has identified vulnerabilities in plugins across the WordPress ecosystem affecting over 20 million downloads. This shows the need for users and web hosts to update plugins promptly on security updates. If you look at it, it beckons for a more “forced” way of updating plugins. It also places additional scrutiny on us, plugin and theme developers, to ensure that we are not only focused on features but place additional emphasis on good, secure, code.

Once a security problem is public there’s no stopping the bad guys in any other way than to update. To us, as authors of plugins that all combined have more than 20 millions downloads and run on over 5% of the top 1 million websites, it made even more clear the need for more scrutiny in our code writing. We could think of no one better than the guys working in the trenches, Sucuri.

Improved security, so we can sleep better

Let me be honest: there’s no such thing as 100% safe software. Ever. But we can strive. From now on, Sucuri will review all the code in our major plugins at least four times a year, on top of our own testing and development best practices. They will work with my team to ensure that the patches we push are adequate and work with us to get the word into as many hands as possible. For all intents and purposes, they will be an extension of my development team, focused strictly on security. We are not foolish enough to think that this is the end all be all to security, no, we realize this is a process and will continue to evolve.

Like all of you, we’re not perfect. We’re sure though, that having the pro’s at Sucuri review our code regularly will lead to our plugins being among the safest out there, which is how we want it. It’s how we, as the good web stewards we strive to be, will take responsibility for what and how we do it – providing our users the best, and most secure, options available. Not just because you sleep better because of it, but because we sleep better because of it too.

But you said “partnered”?

Yes. This will be a relationship in which we reciprocate the service by being an extension of their online marketing team. Sucuri will review our plugins, we’ll help them by reviewing their online practices from a website optimisation point of view. Let’s face it, we can’t all be good at everything, they are great at Security, but could use some help at online marketing and website optmization, and they recognize this, which is why we are going to help them get better.

To start, they have already received our diamond review, our ultimate review package in which we provide a thorough review of their SEO practice, website usability and conversions. Have you seen their latest changes?

In a similar fashion, we’ve made the first improvements to our plugins based on their reviews, luckily showing no critical issues yet.

Additionally, they will be working with us beyond just the code we ship. They will be working with us to improve our overall security posture as an organization and we’ll be leveraging their Website AntiVirus and Firewall products to ensure a safe online experience for all our online visitors. They are the premiere Website Security company and we rock at what we do, it’s only right we make full use of each others services.

Lead, not follow

When I was on the Dradcast 2 months ago, I hinted at some of this. We should lead by showing how people can improve their products and processes. I personally think every premium plugin / theme company should have a process for regular independent security reviews of their product(s). This is an example which I’d love for every company in the WordPress community to follow and document.

We’ll be as transparent as possible about all of the things we do, both Sucuri in how they improve their site as we in how we improve our code. As you can see, we’re very excited to be working with the team at Sucuri and we look forward to making the web safer together!

* For the record: from a purely juridical point of view, the GPL basically disclaims all warranty.

This post first appeared on Yoast. Whoopity Doo!