Launching my latest WordPress plugin: SAC Pro! Unlimited chat forms with tons of great features and no 3rd-party service required (most/all other chat plugins require 3rd-party service). Read the official launch post and get SAC Pro »
Author: Jeff Starr
How to Add Custom Code to WordPress
There are many books and tutorials that share useful code snippets for WordPress. For example, you can find hundreds of custom functions right here at DigWP.com. You can also find them in my WordPress books, tutorials, and code snippets. For many code snippets and custom functions, the usage instructions will say something like:
Add this code to your theme (or child theme’s) functions.php file, or add the code via simple custom plugin.
So what does that actually mean? Let’s take a closer look. First we’ll go through how to add custom code via the functions.php file. Then we’ll explain how to add code by making a simple custom plugin. Finally we’ll wrap things up by explaining the difference between the two methods and how to go further.
Contents
- Add custom code via theme functions.php
- Add custom code via simple custom plugin
- What’s the difference?
- Going further..
Add custom code via theme functions.php
Every WordPress theme can have a file named functions.php. If present in a theme, the functions file must be located in the root directory of the theme:
/wordpress/
	/wp-content/
		/themes/
			/my-theme/
				functions.php
If the functions file does not exist, create it. Then open the file in a code or text editor and add your custom code. Save the file, upload to the server, and done. It is very straightforward. Just make sure to test any new code on a private/test site before adding to a live production site.
Learn more about building themes in my book, WordPress Themes In Depth.
Add custom code via simple custom plugin
With WordPress, plugins add functionality, and themes display content. There is some overlap (and grey area), but in general the best way to add functionality to WordPress is with a plugin. That’s one reason why there are over 50,000 plugins in the WordPress Plugin Directory.
Plugins range in complexity. They can be very advanced, comprising many files and lots of code. Or they can be very simple, made with one file and a few lines of code. To add a custom code snippet, a simple plugin will suffice.
How to make a simple custom plugin
To make a simple custom plugin, follow these steps:
- Create a new PHP file
- Name the file whatever makes sense, can be any alphanumeric string (plus dashes and underscores if needed)
- Open the file and add the header code provided below
- Save the file and done
After creating this file, it is ready for your custom code snippet(s). To save you some time, I’ve created an example plugin that you can download below. It’s ready to go for any custom code that you want to add.
Download a simple custom plugin
Download a copy of our simple custom plugin, ready for your custom code.
↓ Download Simple Custom Plugin (ZIP file < 1 KB)
Usage: Download and unzip the file. Open simple-custom-plugin.php and customize the file header as explained below. Then add your custom code snippet, save changes and done.
Plugin file header
At the beginning of your plugin file, add the following lines:
<?php
/*
	Plugin Name: Simple Custom Plugin
	Plugin URI: https://digwp.com/2022/02/simple-custom-plugin/
	Description: This is a simple plugin template for adding custom code to WordPress.
	Author: Jeff Starr
	Author URI: https://plugin-planet.com/
	Requires at least: 5.9
	Tested up to: 5.9
	Version: 1.0
*/

if (!defined('ABSPATH')) die();

// add custom code snippets below this line..
You can customize the header lines with your actual information. As our simple plugin is meant only for your site and will not be distributed publicly, the file header can be much simpler than what’s required for plugins destined for the WP Plugin Directory. Learn more about plugin file headers at WordPress.org.
Also: notice this line:
if (!defined('ABSPATH')) die();That line is included to prevent direct access to the file. It basically checks if WordPress is loaded; if not, the script simply exits. This is a basic security measure to help prevent anyone from meddling with your custom code.
Remember to use code snippets only from trusted sources. And then test the code on a private site before going live.
What’s the difference?
What’s the difference between adding code via theme functions vs. simple plugin? The main difference is scope. When code is added via your theme template, it will run only when the theme is active. So for example, say we add a custom code snippet that displays social media buttons on posts. If we change themes, the custom code will not run, and the buttons will not be displayed.
Contrast that with adding custom code via simple plugin. As long as the plugin is active, the custom code will run always, regardless of which theme you’re using. Going the plugin route also benefits in terms of things like extensibility and maintainability. Managing custom code via plugins generally is easier than burying it within the theme’s functions file.
So which is best? Neither. The two methods are just different. Which one is best for any given code snippet depends on various factors. Most importantly whether or not the custom code is theme specific or global in scope.
For an easy, no-fuss way to add custom code snippets, check out WPCodeBox.
Going further..
The above simple plugin example is the most basic possible. To go further with plugin development, visit the Plugin Developer Handbook at WordPress.org.
Check out my complete video course on developing WordPress plugins »
Questions and comments welcome! :)


Database Tip: Clean Up User-Agent Data
I just finished up my latest book, Wizard’s SQL Recipes for WordPress. And it’s packed with over 300 time-saving code snippets for managing and optimizing your WordPress database. For example, one of the recipes from the book shows how to delete unwanted user-agent data from the WP comments table. This is an easy optimization step that can help to free up some precious disk space.
Check out the Demo/Table of Contents for Wizard’s SQL Recipes for WordPress.
Show all user-agent data
Did you know that WordPress collects the visitor’s user-agent data for every comment? In the database, user-agent data is stored in the comments table in the comment_agent column. But you would never know it because WordPress does not display the collected user-agent data anywhere in the Admin Area. No worries for us though. A simple SQL query will summon the information:
SELECT comment_ID, comment_author, comment_agent
FROM wp_comments;
If comments have ever been enabled on your site, that simple query may return some surprising results. Or if you’re using an application like phpMyAdmin to manage your database, you can check out all of the user-agent data by visiting the wp_comments table and examining the comment_agent column. To give you a better idea, here is an example of a typical user agent:
Mozilla/5.0 (Macintosh; Intel Mac OS X 10_15_7) AppleWebKit/537.36
(KHTML, like Gecko) Chrome/94.0.4606.81 Safari/537.36
Most comments should have some sort of user agent recorded, although some may not. It depends entirely on the client that the visitor was using when leaving the comment. Incidentally, any collected user-agent data can be used to identify which browsers/clients people (and bots) are using to visit your site.
Tip: WhatIsMyBrowser.com provides an excellent tool for identifying user agents.
In general, user agents can vary greatly. Some user agents consist of a small number of characters, while many others (like the previous example) consist of many characters. Either way, depending on the number of comments, user-agent data can consume a significant amount of space.
Delete all user-agent data
Before going further, if your site uses a plugin that makes use of user agents (remember, WordPress itself does not use user agents for anything), then stop right here. You don’t want to delete any user-agent data. But for everyone else — like probably around 99% of WordPress sites — all of that user-agent information is pretty much useless. So it gives us an excellent opportunity to clean up the database by deleting all user-agent information from the comments table. Here is the magic SQL recipe to do it:
UPDATE wp_comments SET comment_agent = '';Here we replace the user-agent data with a blank/empty value for all comments in the WordPress database. If you would rather replace the data with n/a or any other string, replace '' with 'n/a' or whatever makes sense for your site.
Depending on the number of comments on your site, that simple query can reduce the size of the database considerably. And that’s a good thing.
Want more SQL recipes like this one? Check out Wizard’s SQL Recipes for WordPress — includes an entire chapter on optimizing the WP database!
WPCodeBox – Code Snippets Done Right
Discovered an awesome code snippets plugin called WPCodeBox. There are plenty of code-snippet plugins out there, but this one goes above and beyond with features like cloud-based storage, a growing snippets repository, and a condition builder to control the location and timing of any code snippets. Check it out!
New Book! Wizard’s SQL Recipes for WordPress
Excited to launch my new book: Wizard's SQL Recipes for WordPress. Optimize and manage your WordPress database. Complete chapter on optimizing performance. Over 300 time-saving recipes. Level up your database skills!
How to Disable Gutenberg Styles on the Frontend
By default the Gutenberg Block Editor loads its default CSS/stylesheet on the front-end of your WordPress site. This is fine for most cases, but there may be situations where you want to disable the Gutenberg styles for whatever reason. For example, my free WordPress plugin, Disable Gutenberg, enables users to disable the Gutenberg Block Editor and restore the Classic Editor. Included in the plugin settings is an option called “Enable Frontend” that lets users enable or disable the Gutenberg CSS/styles as desired. This quick DigWP tutorial explains programmatically how to disable Gutenberg styles on the front-end.
Bonus: Disable Gutenberg plugin also enables restoring of Classic Widgets!
Why?
One reason why people may want to remove extraneous/unnecessary CSS/stylesheets from loading is improved site performance. So by disabling the Gutenberg CSS when it’s not needed, that’s one less asset that needs to load for every page request. That can have a huge cumulative effect on the performance of your WordPress site.
FYI the default Gutenberg stylesheet looks like this when included in the source code of your web pages:
<link rel='stylesheet' id='wp-block-library-css' href='https://example.com/wp-includes/css/dist/block-library/style.min.css' type='text/css' media='all' />So you know what to look for.
Disable Gutenberg styles on the front-end
Without further ado, here is the magic code snippet sauce to add to your WordPress-powered site. You can add this code using a plugin such as Code Snippets, or you can add directly via theme (or child theme) functions.php, or add via simple custom plugin. Many ways to add the following code:
// disable gutenberg frontend styles @ https://m0n.co/15
function disable_gutenberg_wp_enqueue_scripts() {

	wp_dequeue_style('wp-block-library');
	wp_dequeue_style('wp-block-library-theme');

}
add_filter('wp_enqueue_scripts', 'disable_gutenberg_wp_enqueue_scripts', 100);
This script disables the default Gutenberg stylesheet wp-block-library, and it also disables the theme-specific Gutenberg stylesheet (if applicable) wp-block-library-theme. That’s all it does, plain and simple.
Note: To re-enable the Gutenberg styles, simply remove the above code snippet.
Bonus: Disable other block stylesheets
In general, any WordPress stylesheet can be disabled using the WP core function, wp_dequeue_style(). For example, if you are using WooCommerce and the Storefront theme, you may want to prevent their related Gutenberg Block CSS/stylesheets from loading on the front-end. To do it, modify the previous code snippet so it looks like this:
// disable gutenberg frontend styles @ https://m0n.co/15
function disable_gutenberg_wp_enqueue_scripts() {

	wp_dequeue_style('wp-block-library');
	wp_dequeue_style('wp-block-library-theme');

	wp_dequeue_style('wc-block-style'); // disable woocommerce frontend block styles
	wp_dequeue_style('storefront-gutenberg-blocks'); // disable storefront frontend block styles

}
add_filter('wp_enqueue_scripts', 'disable_gutenberg_wp_enqueue_scripts', 100);
The wp_dequeue_style() function is what’s doing all the work here. It is very effective and can be used to disable any stylesheet that is registered with WordPress. Check the docs at WordPress.org for more details.
One for the road..
The code techniques so far are kept very minimal for the sake of clarity. But as you probably know, there is much more that can be done when customizing asset loading and so forth. For example, you can add conditional logic so the stylesheets will be disabled only under certain conditions.
To give you an idea of the possibilities, here is a “real-world” example showing how Disable Gutenberg conditionally disables the front-end styles depending on user preference in the plugin settings.
// disable gutenberg frontend styles @ https://m0n.co/15
function disable_gutenberg_wp_enqueue_scripts() {

	global $wp_query;

	if (is_admin()) return;

	$post_id = isset($wp_query->post->ID) ? $wp_query->post->ID : null;

	$options = get_option('disable_gutenberg_options');

	$enable = isset($options['styles-enable']) ? $options['styles-enable'] : false;

	if (!$enable && !disable_gutenberg_whitelist($post_id)) {

		wp_dequeue_style('wp-block-library');
		wp_dequeue_style('wp-block-library-theme');

	}

}
add_filter('wp_enqueue_scripts', 'disable_gutenberg_wp_enqueue_scripts', 100);
Again this is just an example taken from an actively developed plugin. So much more is possible, as WordPress core provides all sorts of useful functions with which to work. So have fun and build something creative :)
Note: The above code snippet taken from the Disable Gutenberg plugin is for example purposes only; so don’t try to use it on any live site. Instead if you want to explore, download the plugin and examine the source code.
Related Posts
More of our posts on Gutenberg Block Editor:
Happy 12th Birthday DigWP!
Digging WordPress serving the community online since May 27th, 2009 :)
Direct link to article | View post at DigWP.com
BBQ Pro Review
Thanks to David McCan over at WebTNG for his in-depth review of my WordPress firewall plugin, BBQ Pro. It's a pleasure to read and packed with plenty of awesome screenshots :)
Direct link to article | View post at DigWP.com
Interview at ThemeIsle!
Thank you to the fine folks at ThemeIsle for the great interview. Always a pleasure talking about my work, WordPress, web dev and security :) Cheers!
Direct link to article | View post at DigWP.com
Fix Site Health Error: The authorization header is missing
Quick post that explains how to fix the error, “The authorization header is missing”. This error may be found under “recommended improvements” in the WordPress Site Health tool (located under the WP menu ▸ Tools ▸ Site Health).
When running a Site Health check, the “authorization header” warning happens when you’ve upgraded WordPress (to version 5.6 or better) and have Permalinks enabled, but the site’s .htaccess rules have not been updated with the latest. This DigWP tutorial explains what’s happening and shows how to fix the error easily with a few clicks.
The authorization header is missing.
Contents
The solution
When testing your WordPress with the Site Health tool, if you get this:
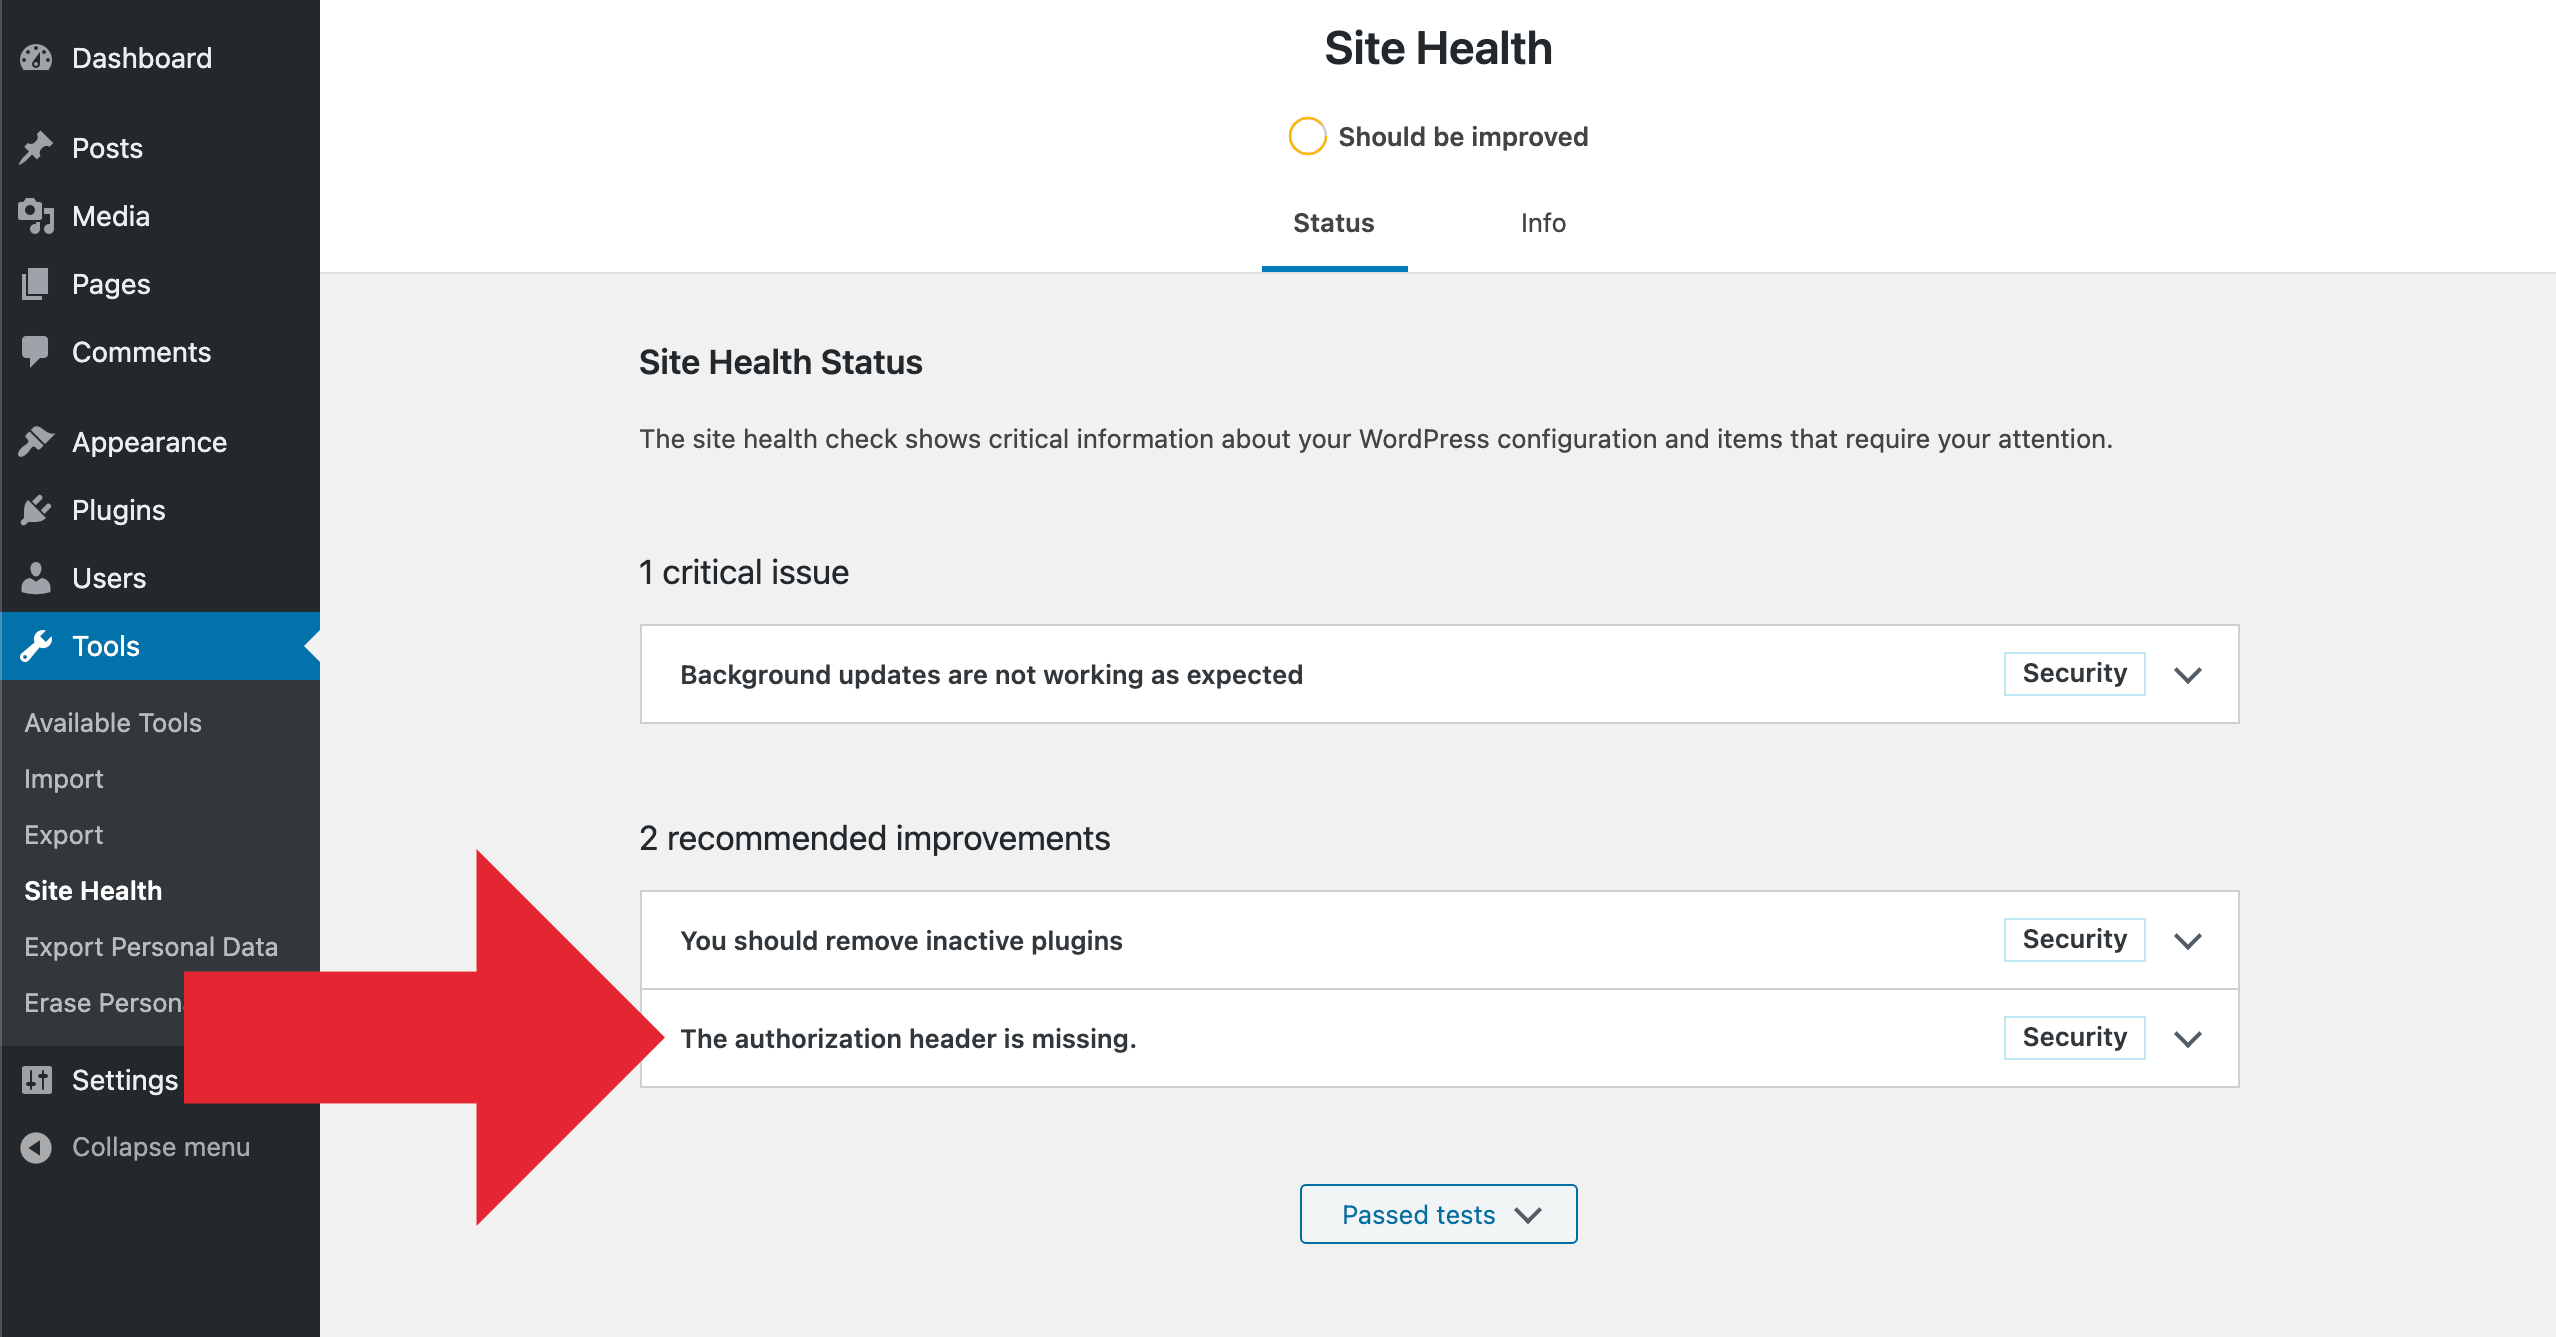 WP menu ▸ Tools ▸ Site Health — The authorization header is missing. Click for full-size image.
If you click the error and toggle it open, you’ll get a bit more information: “The Authorization header comes from the third-party applications you approve. Without it, those apps cannot connect to your site.” Screenshot:
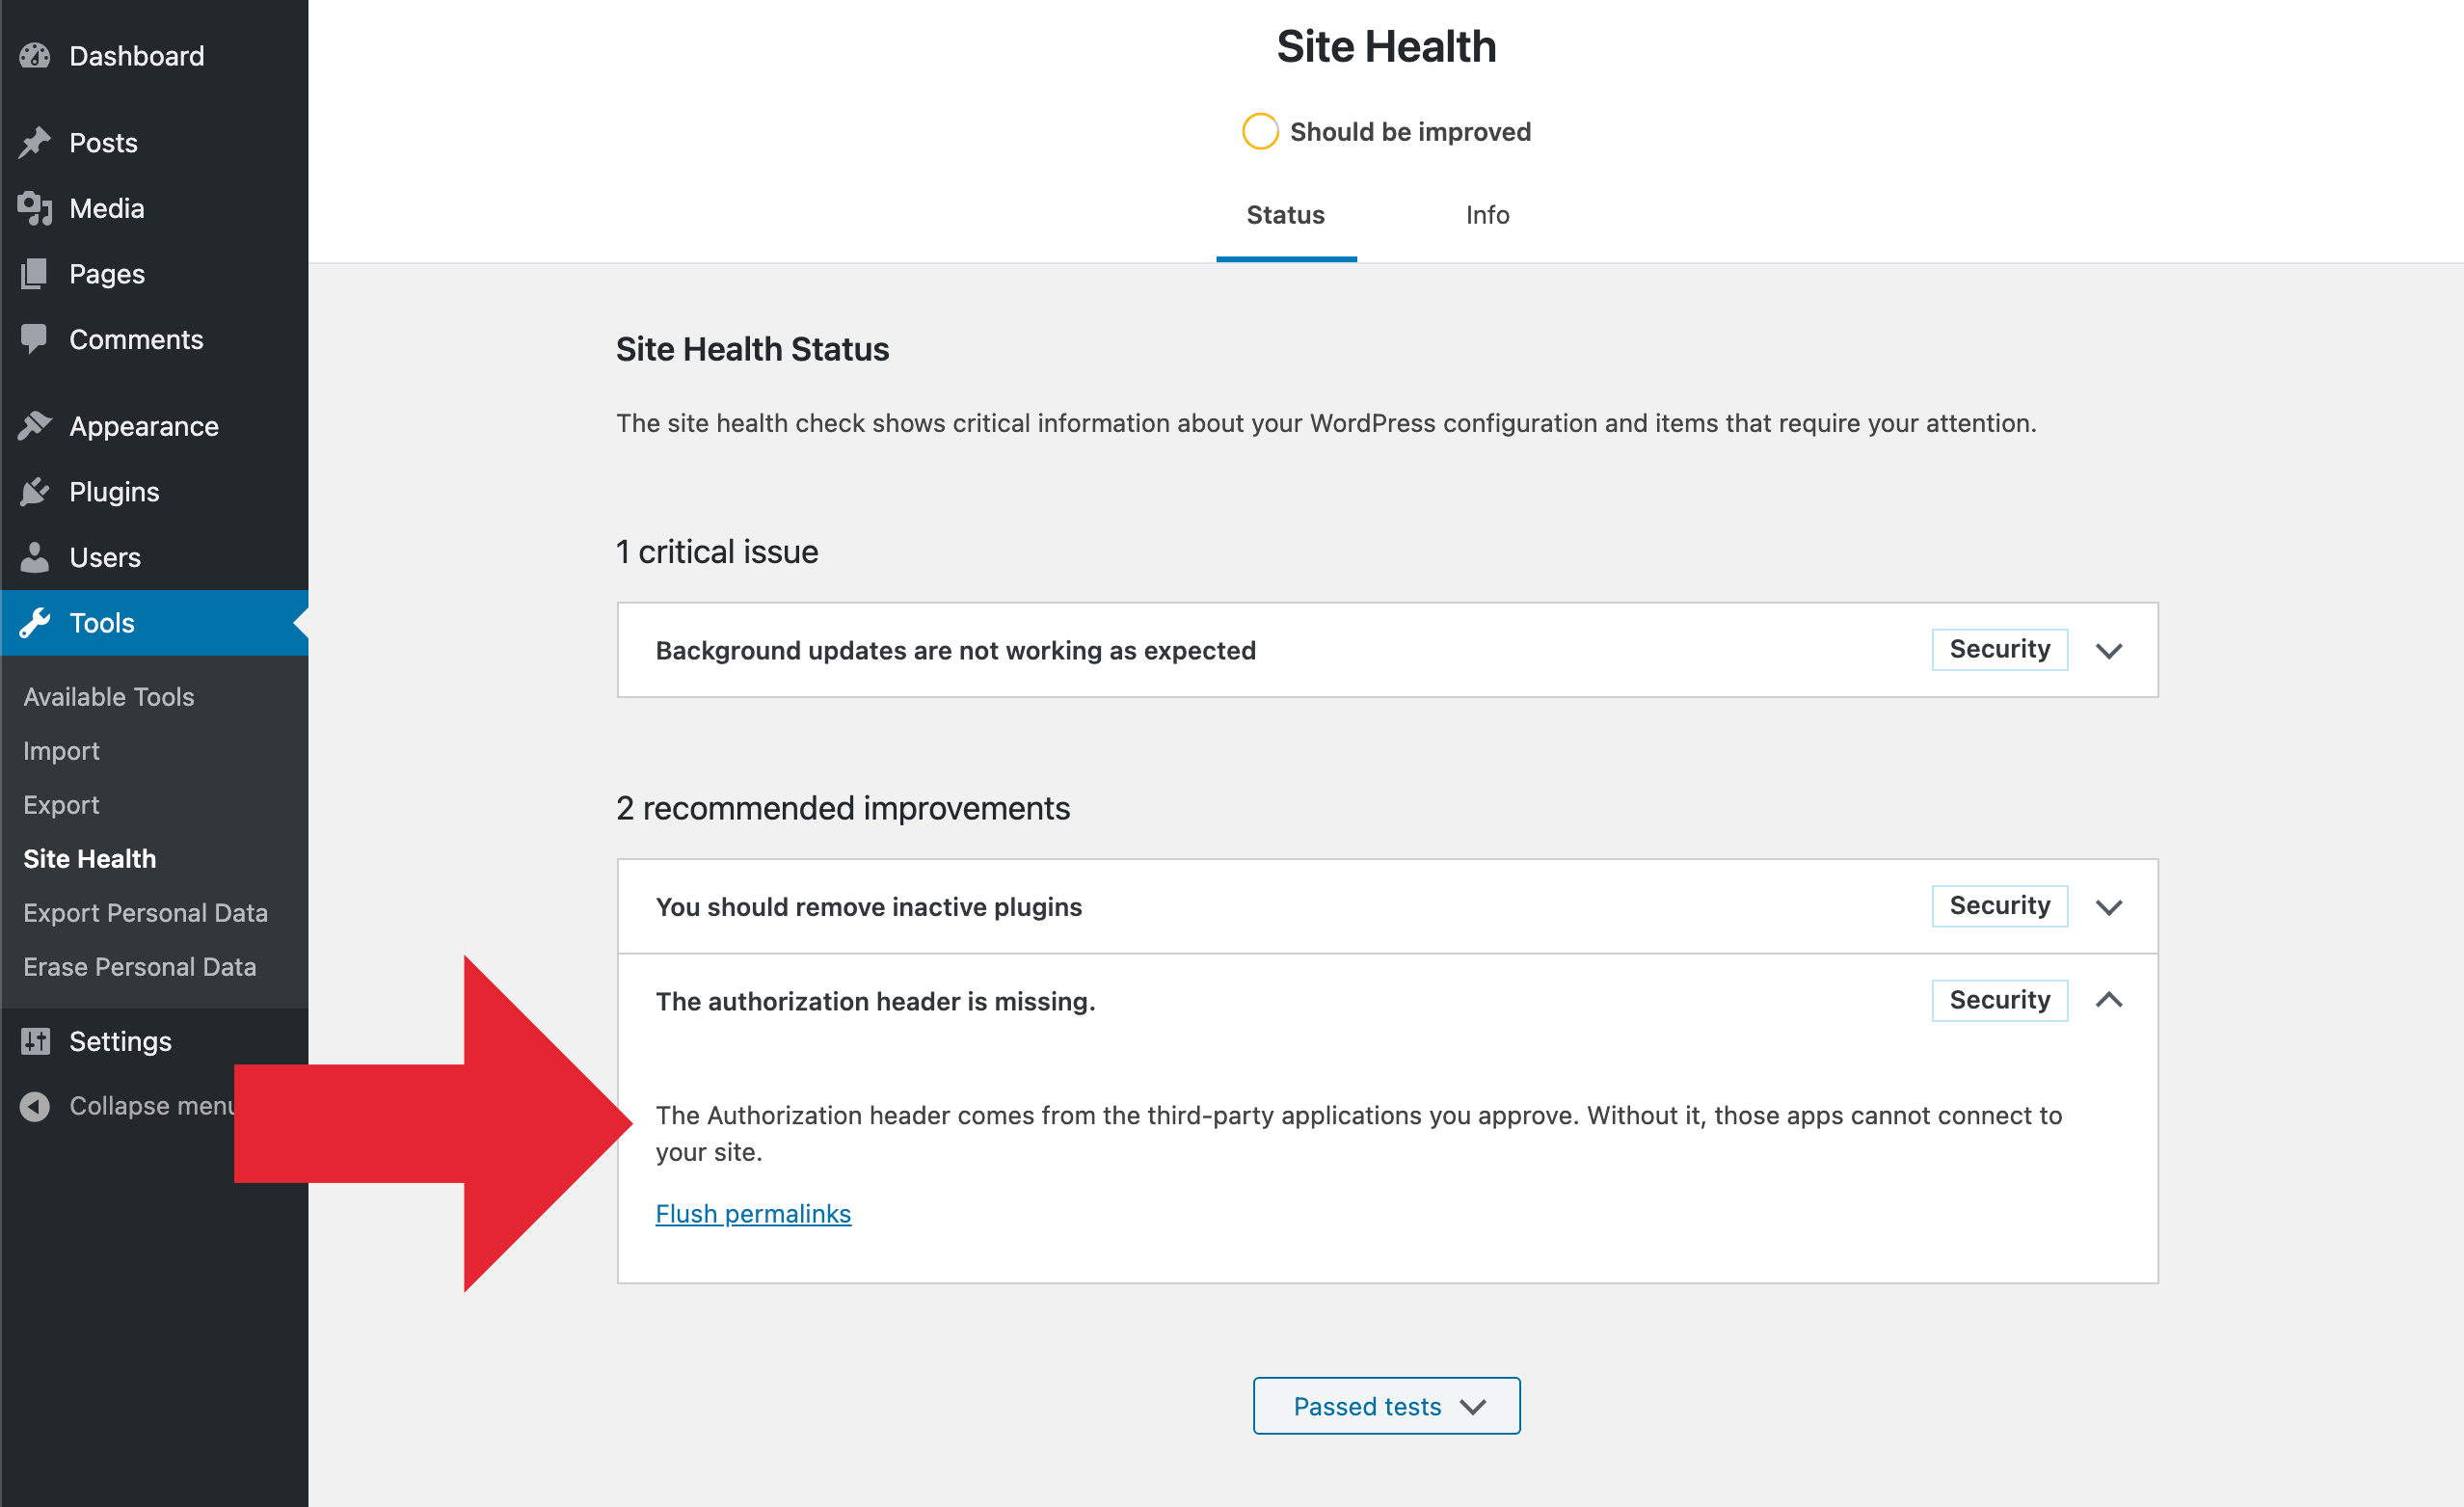 Details about the authorization-header error. Click for full-size image.
This error means that your WordPress Permalink rules are not up-to-date. To fix the issue, you need to update the Permalink rules in your site’s .htaccess file. There are several ways to do this:
- Easy — Visit your Permalink settings and click “Save Changes”
- Manual — Manually update
.htaccesswith current Permalink rules
So try the easy method first. If it works, then stop; you’re done. If it does not work, the “manual” method definitely should resolve the issue. Let’s walk through each of these solutions..
Flush Permalinks
The easiest way to fix the authorization-header issue, is to click on the “Flush permalinks” link, which is displayed right there on the Site Health screen. Here is a screenshot:
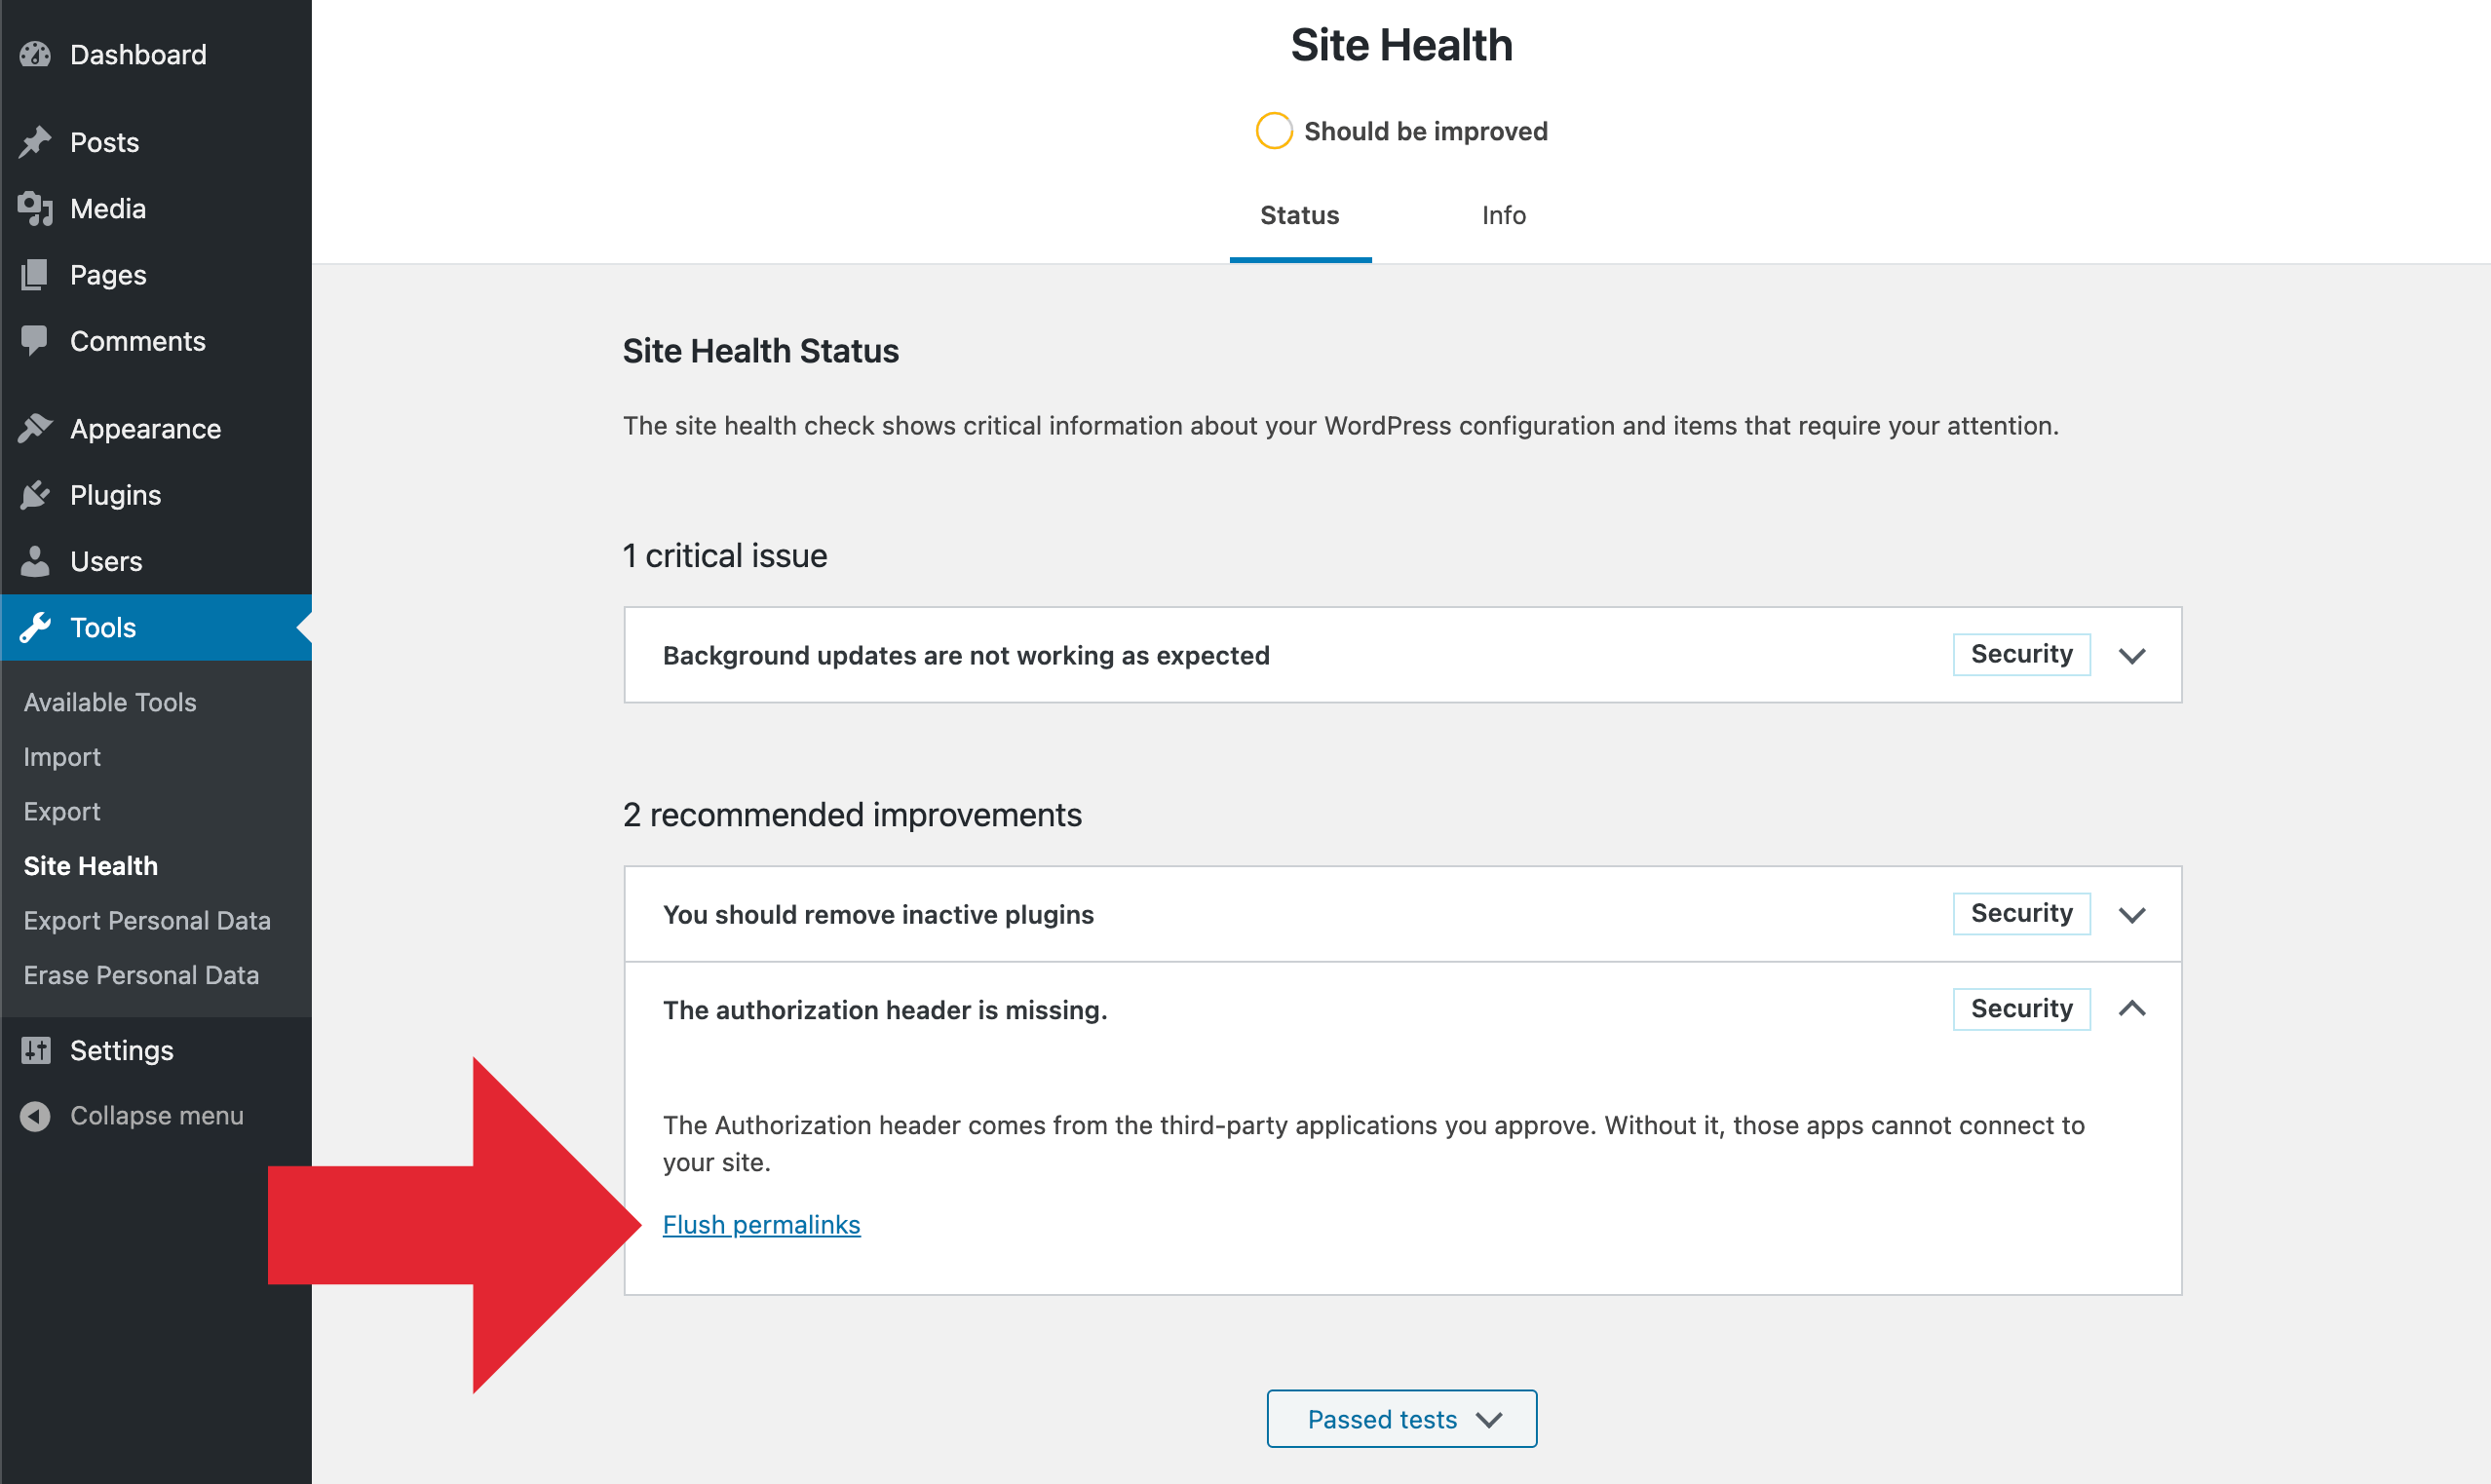 Showing the location of the “Flush permalinks” link. Click for full-size image.
That will take you to the WordPress Permalinks settings. This is where you can “flush” (i.e., update) your site’s Permalink rules. You can do this by clicking the “Save Changes” button as shown here:
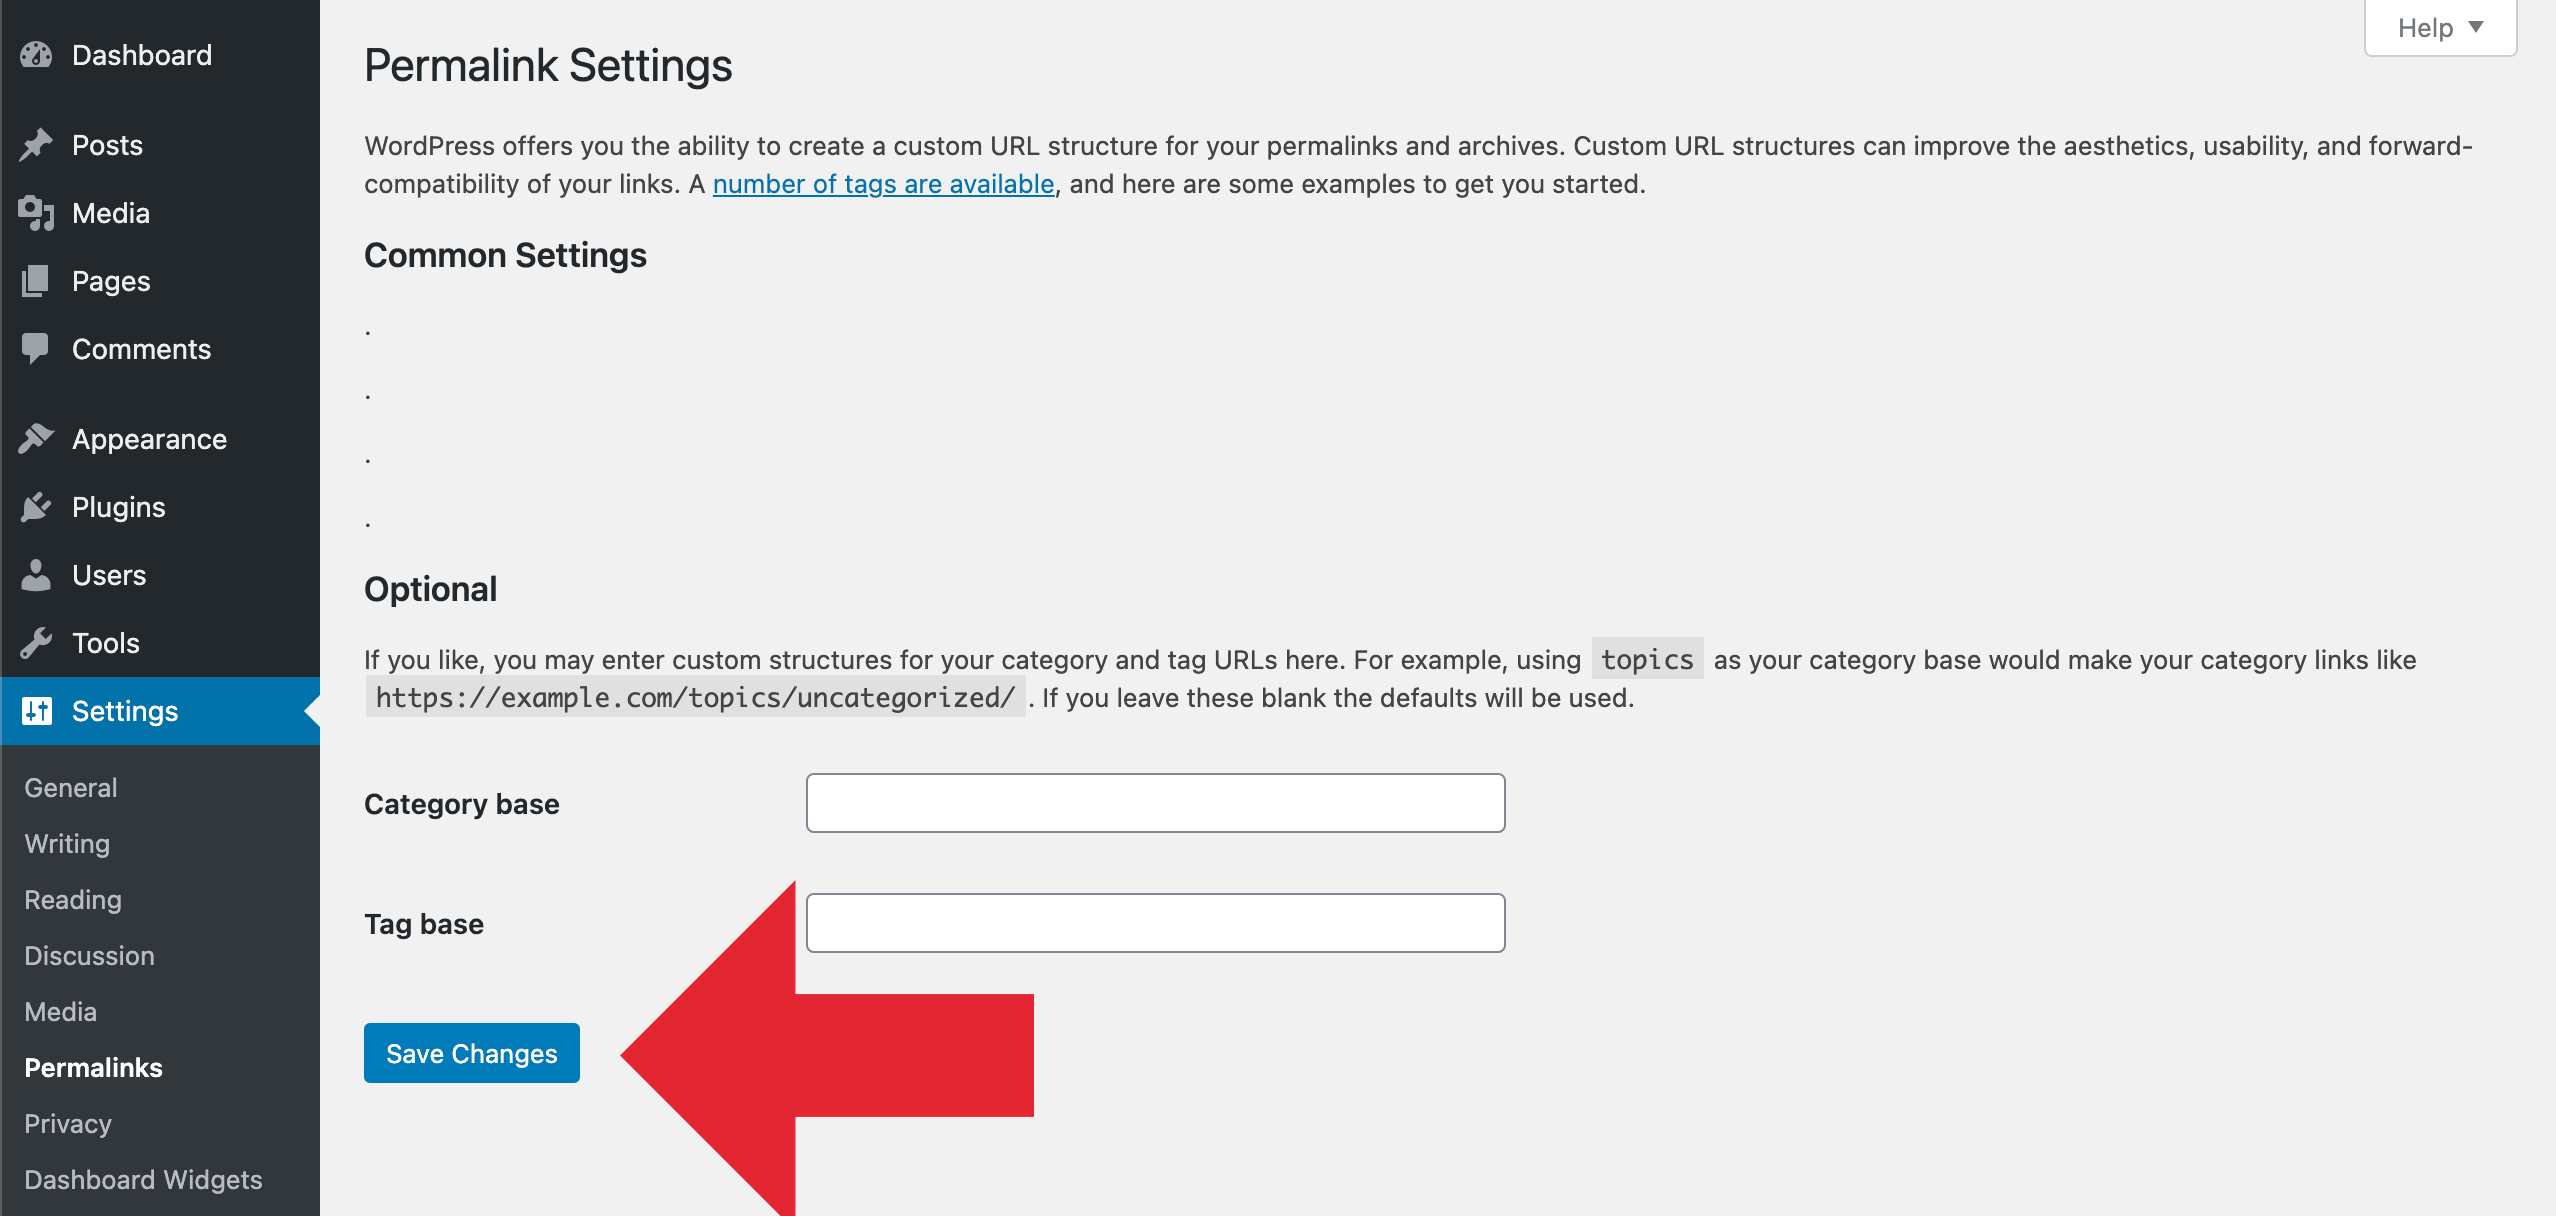 Permalink settings showing the “Save Changes” button. Click for full-size image.
You do NOT need to make any actual changes to any Permalink settings. All you need to do is click “Save Changes” and done. Once you do that, WordPress will attempt to update the site’s .htaccess file with the latest/current Permalink rules. Thus solving the authorization-header issue. You can verify the fix by running a fresh Site Health test.
Important! Updating/flushing Permalink rules via the Admin Area results in changes made to the
.htaccess file on the server. Flushing does not affect the local copy of your .htaccess file. So make sure to update both local and server copies to avoid having to go through this again in the future.Manually update .htaccess
If the easy method does not work to resolve the “authorization header is missing”, you will need to update your Permalink rules manually. To do it, open your site’s .htaccess file. Look for a block of code that begins with this line:
# BEGIN WordPress..and ends with this line:
# END WordPressLocated between these two lines are the WordPress Permalink rules. Whatever you have there, you want to replace with the latest set of rules. You can find the current rules at WordPress.org. So grab a copy of the correct rules for your site (Basic or Multisite), and replace your existing rules via copy/paste. Save the file, upload, and done.
That should resolve the Site Health authorization-header issue. To verify success, try another test with the Site Health tool.
If after updating your Permalink rules, Site Health continues to show the error, most likely there is something else that is interfering with normal functionality. In this case you may contact your support team. Or if you’re savvy, follow our Troubleshooting Guide to help diagnose and resolve any outstanding issues.
About the error
So what causes the “authorization header” error? WordPress version 5.6 introduces Application Passwords. This feature enables authenticated users and apps to interact with your site. Application Passwords started as an awesome free plugin that could be added to any WordPress site as needed. Now it’s been integrated into WordPress core so all sites must have it, whether needed or not.
DigWP Tip: If you have no need for Application Passwords, you can disable them easily with my free plugin, Disable Application Passwords.
WordPress users may be familiar with the new “Application Passwords” settings that are displayed on the Profile screen of every registered user. If you have yet to check it out, go take a look at the bottom of any “Edit User” screen. Here is a screenshot of how it looks in WordPress 5.6:
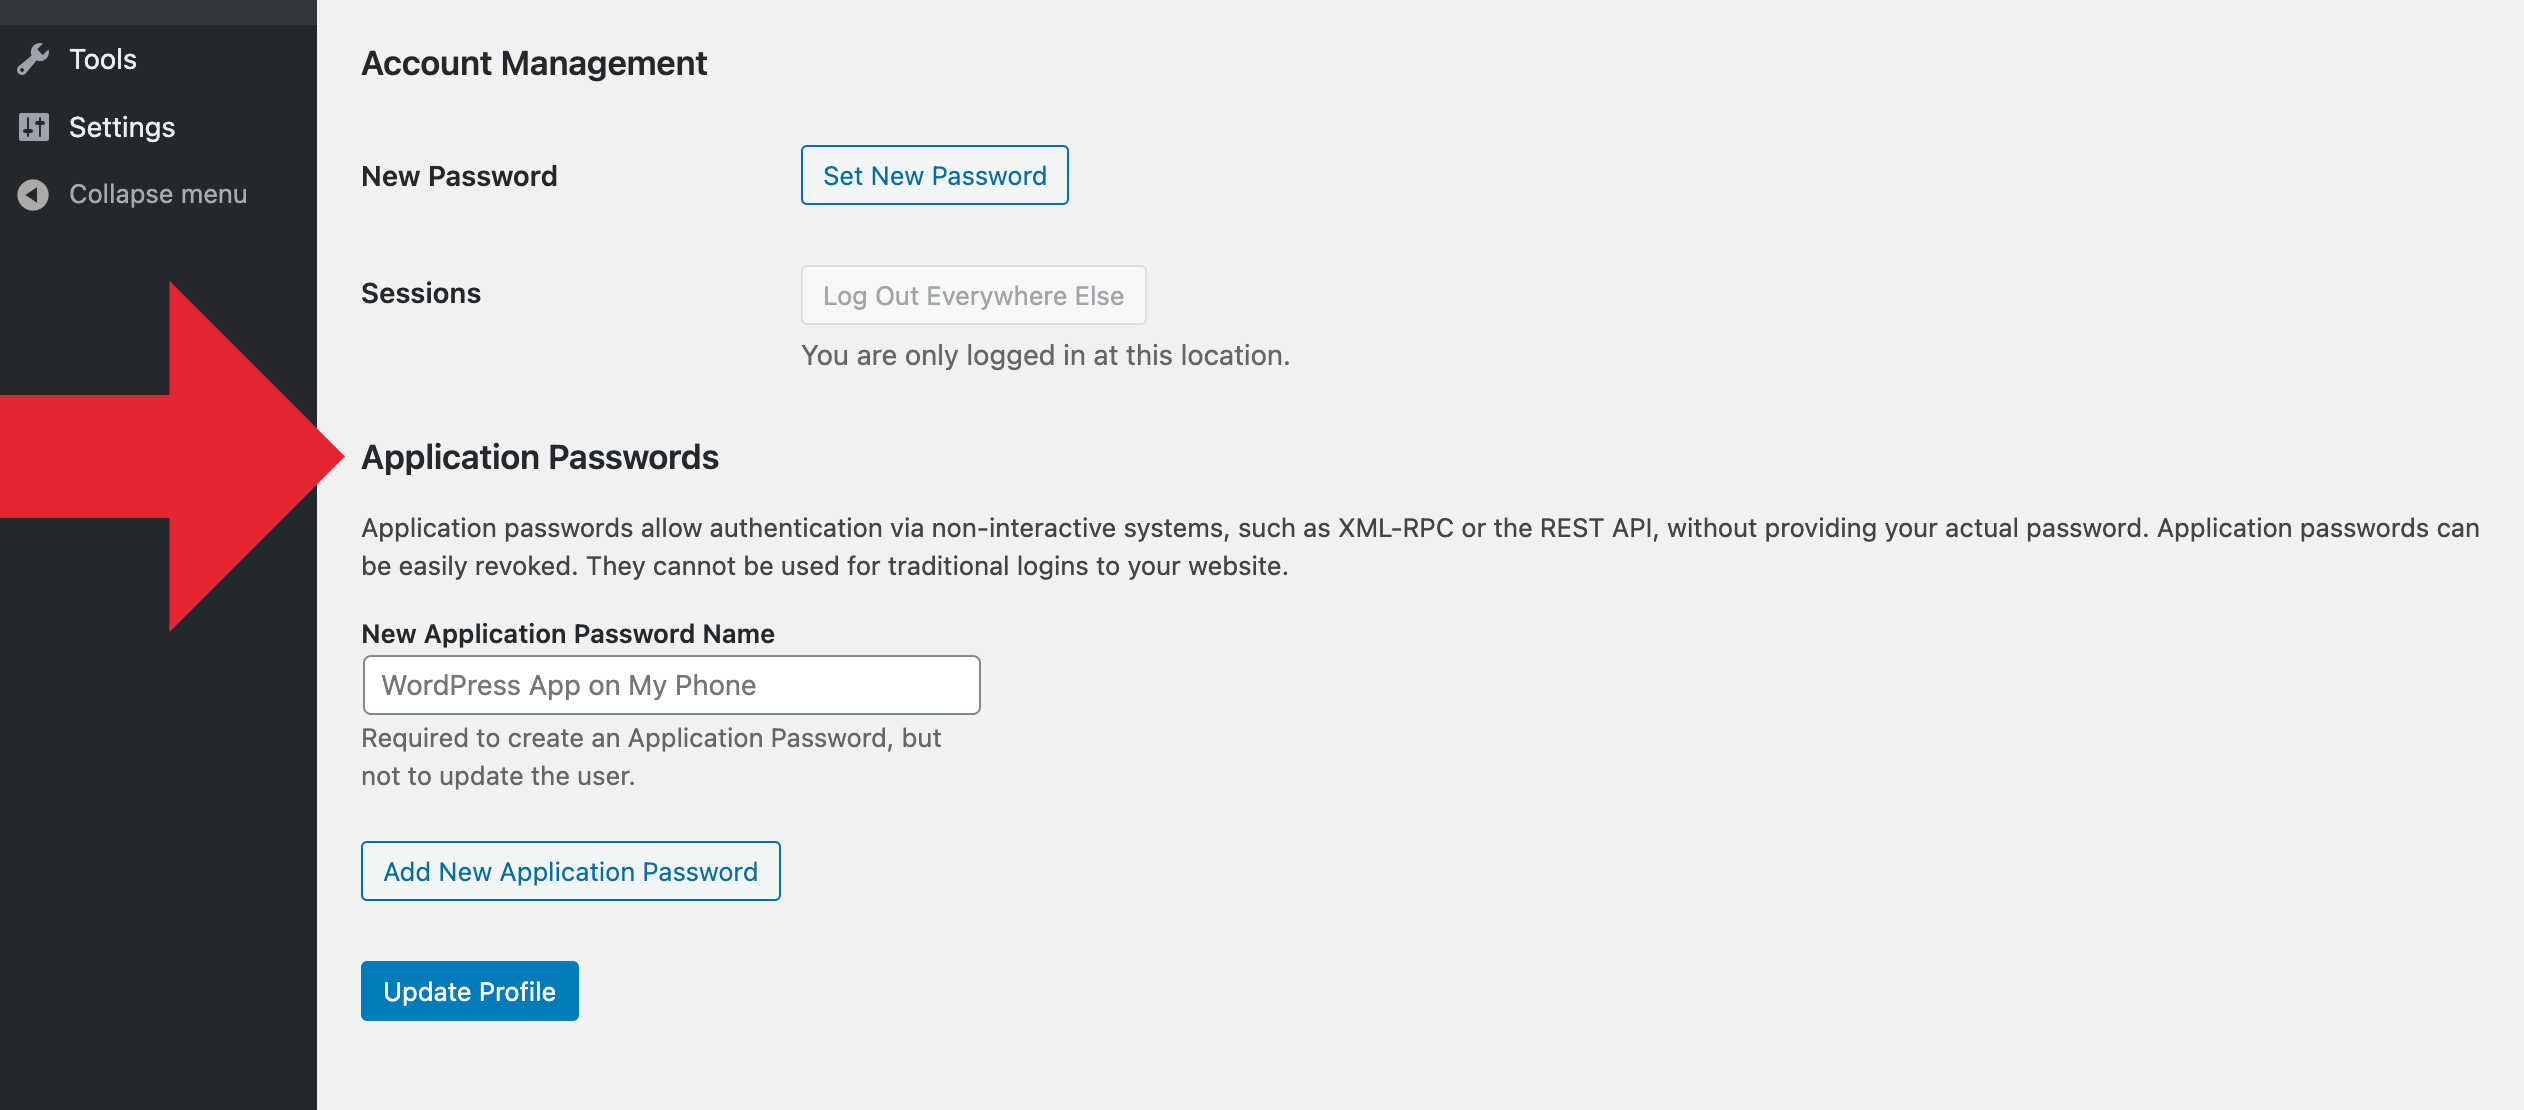 WP menu ▸ User Profile/Edit User ▸ Application Passwords settings. Click for full-size image.
That’s all great, but what most WordPress users probably are not aware of, is that the new Application Passwords feature brings changes to the WordPress Permalink rules located in the site’s .htaccess file. The changes are required for WordPress and Application Passwords to work properly.
.htaccess changes in WP 5.6
Here is the new line that is added to WordPress Permalink rules (via .htaccess) in version 5.6:
RewriteRule .* - [E=HTTP_AUTHORIZATION:%{HTTP:Authorization}]This line helps to handle the Authorization header for HTTP requests coming from any approved third-party applications. Without proper handling of the Authorization header, apps will not be able to connect with your site.
So for sites using outdated Permalink rules, the above new line will be missing from .htaccess. This causes errors when WordPress tries processing requests. The Site Health error happens because WordPress expects certain authorization headers that are not included with the request.
As of now, here is what the WordPress Permalink rules look like in the site’s .htaccess file:
# BEGIN WordPress
# The directives (lines) between "BEGIN WordPress" and "END WordPress" are
# dynamically generated, and should only be modified via WordPress filters.
# Any changes to the directives between these markers will be overwritten.
<IfModule mod_rewrite.c>
RewriteEngine On
RewriteRule .* - [E=HTTP_AUTHORIZATION:%{HTTP:Authorization}]
RewriteBase /
RewriteRule ^index\.php$ - [L]
RewriteCond %{REQUEST_FILENAME} !-f
RewriteCond %{REQUEST_FILENAME} !-d
RewriteRule . /index.php [L]
</IfModule>

# END WordPress
Notice the E=HTTP_AUTHORIZATION rule added right up front there. When that line is included as shown here, the Site Health “authorization header” error should not happen.
DigWP Tip: For a complete guide to Apache/.htaccess, check out my book .htaccess made easy. Features an entire chapter covering all things WordPress :)