hreflang tags are a technical solution for sites that have similar content in multiple languages. The owner of a multilingual site wants search engines to send people to the content in their own language. Say a user is Dutch and the page that ranks is English, but there’s also a Dutch version. You would want Google to show the Dutch page in the search results for that Dutch user. This is the kind of problem hreflang was designed to solve.
In this (very long) article we’ll discuss:
hreflang tags are among the hardest specs I’ve ever seen come out of a search engine. Doing it right is tough and takes time. The aim of this guide is to prevent you from falling into common traps, so be sure to read it thoroughly if you’re embarking on an hreflang project.
Need help implementing hreflang as part of your international SEO project? Our Multilingual SEO training is designed to help you understand the process and put it into practice. You’ll have a killer international SEO strategy in no time.
What are hreflang tags for?
hreflang tags are a method to mark up pages that are similar in meaning but aimed at different languages and/or regions. There are three common ways to implement hreflang:
- Content with regional variations like en-us and en-gb.
- Content in different languages like en, de and fr.
- A combination of different languages and regional variations.
hreflang tags are fairly commonly used to target different markets that use the same language – for example, to differentiate between the US and the UK, or between Germany and Austria.
What’s the SEO benefit of hreflang?
So why are we even talking about hreflang? What is the SEO benefit? From an SEO point of view, there are two main reasons why you should implement it.
First of all, if you have a version of a page that you have optimized for the users’ language and location, you want them to land on that page. Having the right language and location dependent information improves their user experience and thus leads to fewer people bouncing back to the search results. Fewer people bouncing back to the search results leads to higher rankings.
The second reason is that hreflang prevents the problem of duplicate content. If you have the same content in English on different URLs aimed at the UK, the US, and Australia, the difference on these pages might be as small as a change in prices and currency. Without hreflang, Google might not understand what you’re trying to do and see it as duplicate content. With hreflang, you make it very clear to the search engine that it’s (almost) the same content, just optimized for different people.
What is hreflang?
hreflang is code, which you can show to search engines in three different ways – and there’s more on that below. By using this code, you specify all the different URLs on your site(s) that have the same content. These URLs can have the same content in a different language, or the same language but targeted at a different region.
What does hreflang achieve?
Who supports hreflang?
hreflang is supported by Google and Yandex. Bing doesn’t have an equivalent but does support language meta tags.
In a complete hreflang implementation, every URL specifies which other variations are available. When a user searches, Google goes through the following process:
- it determines that it wants to rank a URL;
- it checks whether that URL has hreflang annotations;
- it presents the searcher with the results with the most appropriate URL for that user.
The user’s current location and his language settings determine the most appropriate URL. A user can have multiple languages in his browser’s settings. For example, I have Dutch, English, and German in there. The order in which these languages appear in my settings determines the most appropriate language.
Should you use hreflang?
Tip: homepage first!
If you’re not sure on whether you want to implement hreflang on your entire site, start with your homepage! People searching for your brand will get the right page. This is a lot easier to implement and it will “catch” a large part of your traffic.
Now we’ve learned on what hreflang is and how it works, we can decide whether you should use it. You should use it if:
- you have the same content in multiple languages;
- you have content aimed at different geographic regions but in the same language.
It doesn’t matter whether the content you have resides on one domain or multiple domains. You can link variations within the same domain but can also link between domains.

Architectural implementation choices
One thing is very important when implementing hreflang: don’t be too specific! Let’s say you have three types of pages:
- German
- German, specifically aimed at Austria
- German, specifically aimed at Switzerland
You could choose to implement them using three hreflang attributes like this:
- de-de targeting German speakers in Germany
- de-at targeting German speakers in Austria
- de-ch targeting German speakers in Switzerland
However, which of these three results should Google show to someone searching in German in Belgium? The first page would probably be the best. To make sure that every user searching in German who does not match either de-at or de-ch gets that one, change that hreflang attribute to just de. In many cases, specifying just the language is a smart thing to do.
It’s good to know that when you create sets of links like this, the most specific one wins. The order in which the search engine sees the links doesn’t matter; it’ll always try to match from most specific to least specific.
Technical implementation – the basics
Regardless of which type of implementation you choose – and there’s more on that below – there are three basic rules.
1. Valid hreflang attributes
The hreflang attribute needs to contain a value that consists of the language, which can be combined with a region. The language attribute needs to be in ISO 639-1 format (a two-letter code).
Wrong region codes
Google can deal with some of the common mistakes with region codes, although you shouldn’t take any chances. For instance, it can deal with en-uk just as well as with the “correct” en-gb. However, en-eu does not work, as eu doesn’t define a country.
The region is optional and should be in ISO 3166-1 Alpha 2 format, more precisely, it should be an officially assigned element. Use this list from Wikipedia to verify you’re using the right region and language codes. This is where things often go wrong: using the wrong region code is a very common problem.
2. Return links
The second basic rule is about return links. Regardless of your type of implementation, each URL needs return links to every other URL, and these links should point at the canonical versions, more on that below. The more languages you have the more you might be tempted to limit those return links – but don’t. If you have 80 languages, you’ll have hreflang links for 80 URLs, and there’s no getting around it.
3. hreflang link to self
The third and final basic rule is about self-links. It may feel weird to do this, just as those return links might feel weird, but they are essential and your implementation will not work without them.
Technical implementation choices
There are three ways to implement hreflang:
- using link elements in the <head>
- using HTTP headers
- or using an XML sitemap.
Each has its uses, so we’ll explain them and discuss which you should choose.
1. HTML hreflang link elements in your <head>
The first method to implement hreflang we’ll discuss is HTML hreflang link elements. You do this by adding code like this to the <head> section of every page:
<link rel="alternate" href="http://example.com/"
  hreflang="en" />
<link rel="alternate" href="http://example.com/en-gb/"
  hreflang="en-gb" />
<link rel="alternate" href="http://example.com/en-au/"
  hreflang="en-au" />
As every variation needs to link to every other variation, these implementations can become quite big and slow your site down. If you have 20 languages, choosing HTML link elements would mean adding 20 link elements as shown above to every page. That’s 1.5KB on every page load, that no user will ever use, but will still have to download. On top of that, your CMS will have to do several database calls to generate all these links. This markup is purely meant for search engines. That’s why I would not recommend this for larger sites, as it adds far too much unnecessary overhead.
2. hreflang HTTP headers
The second method of implementing hreflang is through HTTP headers. HTTP headers are for all your PDFs and other non-HTML content you might want to optimize. Link elements work nicely for HTML documents, but not for other types of content as you can’t include them. That’s where HTTP headers come in. They should look like this:
Link: <http://es.example.com/document.pdf>;
rel="alternate"; hreflang="es",
<http://en.example.com/document.pdf>;
rel="alternate"; hreflang="en",
<http://de.example.com/document.pdf>;
rel="alternate"; hreflang="de"
The problem with having a lot of HTTP headers is similar to the problem with link elements in your <head>: it adds a lot of overhead to every request.
3. An XML sitemap hreflang implementation
The third option to implement hreflang is using XML sitemap markup. It uses the xhtml:link attribute in XML sitemaps to add the annotation to every URL. It works very much in the same way as you would in a page’s <head> with <link> elements. If you thought link elements were verbose, the XML sitemap implementation is even worse. This is the markup needed for just one URL with two other languages:
<url>
  <loc>http://www.example.com/uk/</loc>
  <xhtml:link rel="alternate" hreflang="en"
 href="http://www.example.com/" />
  <xhtml:link rel="alternate" hreflang="en-au"
 href="http://www.example.com/au/" />
  <xhtml:link rel="alternate" hreflang="en-gb"
 href="http://www.example.com/uk/" />
</url>
You can see it has a self-referencing URL as the third URL, specifying the specific URL is meant for en-gb, and it specifies two other languages. Now, both other URLs would need to be in the sitemap too, which looks like this:
<url>
  <loc>http://www.example.com/</loc>
  <xhtml:link rel="alternate" hreflang="en"
 href="http://www.example.com/" />
  <xhtml:link rel="alternate" hreflang="en-au"
 href="http://www.example.com/au/" />
  <xhtml:link rel="alternate" hreflang="en-gb"
 href="http://www.example.com/uk/" />
</url>
<url>
  <loc>http://www.example.com/au/</loc>
  <xhtml:link rel="alternate" hreflang="en"
 href="http://www.example.com/" />
  <xhtml:link rel="alternate" hreflang="en-au"
 href="http://www.example.com/au/" />
  <xhtml:link rel="alternate" hreflang="en-gb"
 href="http://www.example.com/uk/" />
</url>
As you can see, basically we’re only changing the URLs within the <loc> element, as everything else should be the same. With this method, each URL has a self-referencing hreflang attribute, and return links to the appropriate other URLs.
XML sitemap markup like this is very verbose: you need a lot of output to do this for a lot of URLs. The benefit of an XML sitemap implementation is simple: your normal users won’t be bothered with this markup. You don’t end up adding extra page weight and it doesn’t require a lot of database calls on page load to generate this markup.
Another benefit of adding hreflang through the XML sitemap is that it’s usually a lot easier to change an XML sitemap than to change all the pages on a site. There’s no need to go through large approval processes and maybe you can even get direct access to the XML sitemap file.
Other technical aspects of an hreflang implementation
Once you’ve decided your implementation method, there are a couple of other technical considerations you should know about before you start implementing hreflang.
hreflang x-default
x-default is a special hreflang attribute value that specifies where a user should be sent if none of the languages you’ve specified in your other hreflang links match their browser settings. In a link element it looks like this:
<link rel="alternate" href="http://example.com/"
  hreflang="x-default" />
When it was introduced, it was explained as being for “international landing pages”, ie pages where you redirect users based on their location. However, it can basically be described as the final “catch-all” of all the hreflang statements. It’s where users will be sent if their location and language don’t match anything else.
In the German example we mentioned above, a user searching in English still wouldn’t have a URL that fits them. That’s one of the cases where x-default comes into play. You’d add a fourth link to the markup, and end up with these 4:
In this case, the x-default link would point to the same URL as the de one. We wouldn’t advise you to remove the de link though, even though technically that would create exactly the same result. In the long run, it’s usually better to have both as it specifies the language of the de page – and it makes the code easier to read.
hreflang and rel=canonical
rel="canonical"
If you don’t know what rel=”canonical” is, read this article!
rel=”alternate” hreflang=”x”markup and rel=”canonical” can and should be used together. Every language should have a rel=”canonical” link pointing to itself. In the first example, this would look like this, assuming that we’re on the example.com homepage:
<link rel="canonical" href="http://example.com/">
<link rel="alternate" href="http://example.com/"
  hreflang="en" />
<link rel="alternate" href="http://example.com/en-gb/"
  hreflang="en-gb" />
<link rel="alternate" href="http://example.com/en-au/"
  hreflang="en-au" />
If we were on the en-gb page, only the canonical would change:
<link rel="canonical" href="http://example.com/en-gb/">
<link rel="alternate" href="http://example.com/"
  hreflang="en" />
<link rel="alternate" href="http://example.com/en-gb/"
  hreflang="en-gb" />
<link rel="alternate" href="http://example.com/en-au/"
  hreflang="en-au" />
Don’t make the mistake of setting the canonical on the en-gb page to http://example.com/, as this breaks the implementation. It’s very important that the hreflang links point to the canonical version of each URL, because these systems should work hand in hand!
If you’ve come this far, you’ll probably be thinking “wow this is hard”! I know – I thought that when I first start to learn about it. Luckily, there are quite a few tools available if you dare to start implementing hreflang.
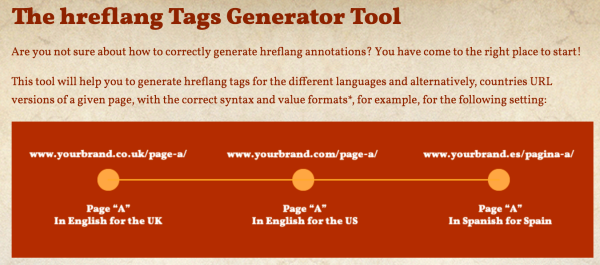
hreflang tag generator
Aleyda Solis, who has also written quite a lot about this topic, has created a very useful hreflang tag generator that helps you generate link elements. Even when you’re not using a link element implementation, this can be useful to create some example code.
hreflang XML sitemap generator
The Media Flow have created an hreflang XML sitemap generator. Just feed it a CSV with URLs per language and it creates an XML sitemap. This is a great first step when you decide to take the sitemap route.
The CSV file you feed this XML sitemap generator needs a column for each language. If you want to add an x-default URL to it as well, just create a column called x-default.
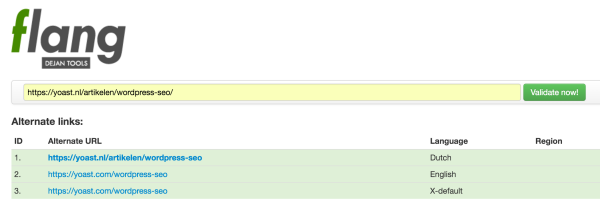
hreflang tag validator
Once you’ve added markup to your pages, you’ll want to validate it. If you choose to go the link element in the <head> route, you’re in luck, as there are a few validator tools out there. The best one we could find is flang, by DejanSEO.
Unfortunately, we haven’t found a validator for XML sitemaps yet.
Making sure hreflang keeps working: process
Once you’ve created a working hreflang setup, you need to set up maintenance processes. It’s probably also a good idea to regularly audit your implementation to make sure it’s still set up correctly.
Make sure that people in your company who deal with content on your site know about hreflang so that they won’t do things that break your implementation. Two things are very important:
- When a page is deleted, check whether its counterparts are updated.
- When a page is redirected, change the hreflang URLs on its counterparts.
If you do that and audit regularly, you shouldn’t run into any issues.
Conclusion
Setting up hreflang is a cumbersome process. It’s a tough standard with a lot of specific things you should know and deal with. This guide will be updated as new things are introduced around this specification and best practices evolve, so check back when you’re working on your implementation again!
Read more: rel=canonical: what is it and how (not) to use it »
The post hreflang: the ultimate guide appeared first on Yoast.